はじめに
前回 はFirebaseを利用してiOSにRemote Notificationを送信することについて書きました。node-apn が気になりました。node-apnを利用してRemote Notificationを送信してみたいと思います。
プロジェクトの用意
ベースプロジェクトはExpress を使ってしまいましょう。
1
2
3
4
Node . js : v7 . 3.0
npm : v3 . 10.10
Express : v4 . 15.0
nodebrew : v0 . 9.6
① Expressコマンドでpushtestプロジェクトの生成
1
$ express - t ejs pushtest
すると下記のプロジェクト構成が出来上がります。
1
2
3
4
5
6
7
8
9
10
pushtest
├── app . js
├── bin
│ └── www
├── package . json
├── public
├── routes
│ ├── index . js
│ └── users . js
└── views
因みに、expressコマンドを打つにはexpressとexpress-generatorのインストールが必要です。node_modulesへのパスを.bash_profileに通しておきましょう。
1
2
export PATH = $HOME / . nodebrew / current / bin : $PATH
export NODE_PATH = $HOME / . nodebrew / current / lib / node_modules
source ~/.bash_profileで最新状況を読み込むのを忘れずに。
② node-apnのインストール
1
$ npm install node - apn -- save
因みに、必要なモジュールをインストールしたつもりでも、何度もCannot find module xxxと出てしまうようであれば、app.jsと同じ階層下でnpm install -dを実行しましょう。
処理を実装
プロジェクトが用意できたので、処理を実装していきましょう。
・特定の端末のデバイストークンを指定
① app.jsに処理を実装app.jsに用意します。
1
2
3
4
5
6
7
8
9
10
11
12
13
14
15
16
17
18
19
20
var express = require ( 'express' );
var path = require ( 'path' );
var favicon = require ( 'serve-favicon' );
var logger = require ( 'morgan' );
var cookieParser = require ( 'cookie-parser' );
var bodyParser = require ( 'body-parser' );
var index = require ( './routes/index' );
var users = require ( './routes/users' );
var apns = require ( './routes/apns' ); // apns.jsは④で作成しますが、既にある体で追記
var app = express ();
// 省略
app . use ( '/' , index );
app . use ( '/users' , users );
app . use ( '/apns' , apns ); // GETリクエストを受けられるように追記
// 省略
② routes/apns.jsを作成
最後にメインとなる処理を書いていきます。routes/apns.jsを作成し、その内部にnode-apnを利用した処理を書いていきます。APNS Keyを利用するため、別途AuthKey_xxxxxxxxxx.p8を用意しましょう。
その結果、プロジェクト構成としては下記のようになります。
1
2
3
4
5
6
7
8
9
10
11
12
13
pushtest
├── app . js
├── bin
│ └── www
├── key
│ └── AuthKey_xxxxxxxxxx . p8
├── package . json
├── public
├── routes
│ ├── apns . js
│ ├── index . js
│ └── users . js
└── views
続いて具体的な処理です。
1
2
3
4
5
6
7
8
9
10
11
12
13
14
15
16
17
18
19
20
21
22
23
24
25
26
27
28
29
30
31
32
33
34
35
36
37
var express = require ( 'express' );
var apn = require ( 'apn' );
var qs = require ( 'qs' );
var router = express . Router ();
router . get ( '/' , function ( req , res , next ) {
// GETパラメータからトークンを取得
var arr = req . url . split ( "?" );
var obj = qs . parse ( arr [ 1 ]);
var deviceToken = obj . token ;
// プッシュ通知の設定
var options = {
token : {
key : "./keys/AuthKey_xxxxxxxxxx.p8" ,
keyId : "xxxxxxxxxx" ,
teamId : "xxxxxxxxxx"
},
production : false
};
var apnProvider = new apn . Provider ( options );
var note = new apn . Notification ();
note . expiry = Math . floor ( Date . now () / 1000 ) + 3600 ;
note . badge = 3 ;
note . sound = "ping.aiff" ;
note . alert = "プッシュ通知が届きましたよ!" ;
note . topic = "com.xxx.NotificationSample" ;
// プッシュ送信
apnProvider . send ( note , deviceToken ). then ( ( result ) => {
res . send ( "respond with a resource" );
});
});
module . exports = router ;
プッシュ通知を送信
準備ができたのでプッシュ通知を送ってみましょう。
① Nodeを起動
デバッグしながら起動するために下記を実行します。
1
$ node -- inspect -- debug - brk bin / www
すると、下記出力がされるのでChromeでアクセスしましょう。
1
2
3
4
Debugger listening on port 9229 .
Warning : This is an experimental feature and could change at any time .
To start debugging , open the following URL in Chrome :
chrome - devtools : //devtools/bundled/inspector.html?experiments=true&v8only=true&ws=127.0.0.1:9229/xxxxxxxx-xxxx-xxxx-xxxx-xxxxxxxxxxxx
② プッシュ通知を送る
下記URLにアクセスしてGETリクエストを投げましょう。
1
http : //localhost:3000/apns?token=xxxxxxxxxxxxxxxxxxxxxxxxxxxxxxxxxxxxxxxxxxxxxxxxxxxxxxxxxxxxxxxx
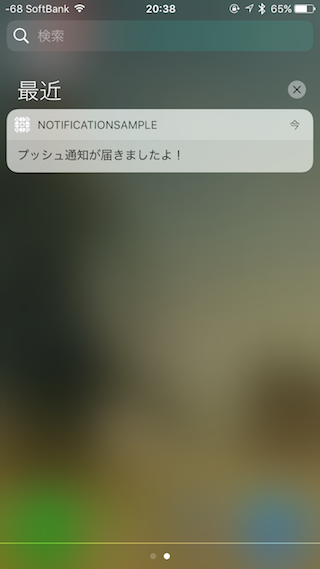
たったこれだけで下図のようにプッシュ通知が届きました。
まとめ
さて今回はnode-apnでのプッシュ通知について書きました。Silent Remote Notificationを試そう! で利用したりしていたのですが、今見るといろいろと変わっているなと改めて感じました。Firebaseに没頭していこうかなと…笑
