iOS7で新たに追加されたSilent Remote Notificationを使ってみよう!!
本日はiOS7から新たに追加されたSilent Remote Notificationについて紹介します。
iOS6までで利用できたRemote Notificationと何が違うのかと言いますと、ユーザ端末のロック画面に表示させることなく通知することができるんです。
つまり、
Remote Notification: ユーザに何かを気づかせるためにプッシュする
Silent Remote Notification: ユーザに気づかせることなくプッシュする
ということです。
これを見ると、『Silent Remote Notificationって使い道あるの??』なんて思ってしまいそうですよね。これが意外とありそうなんです。
例えば、
・ユーザに気づかれずにアプリ内の情報を最新に更新する
・ユーザに気づかれずにアプリ内のユーザ情報を取得する
ことなどが考えられます。
後者はユーザ視点からすると気になるかもしれませんが、『アプリの有用性をユーザに最大限に感じてもらうための方法』と考えて頂ければとても大切なことであると伝わるでしょうか。
そんな様々な使い道がありそうなSilent Remote Notificationについて早速説明していきます。
ネイティブソースとXcode5の設定について
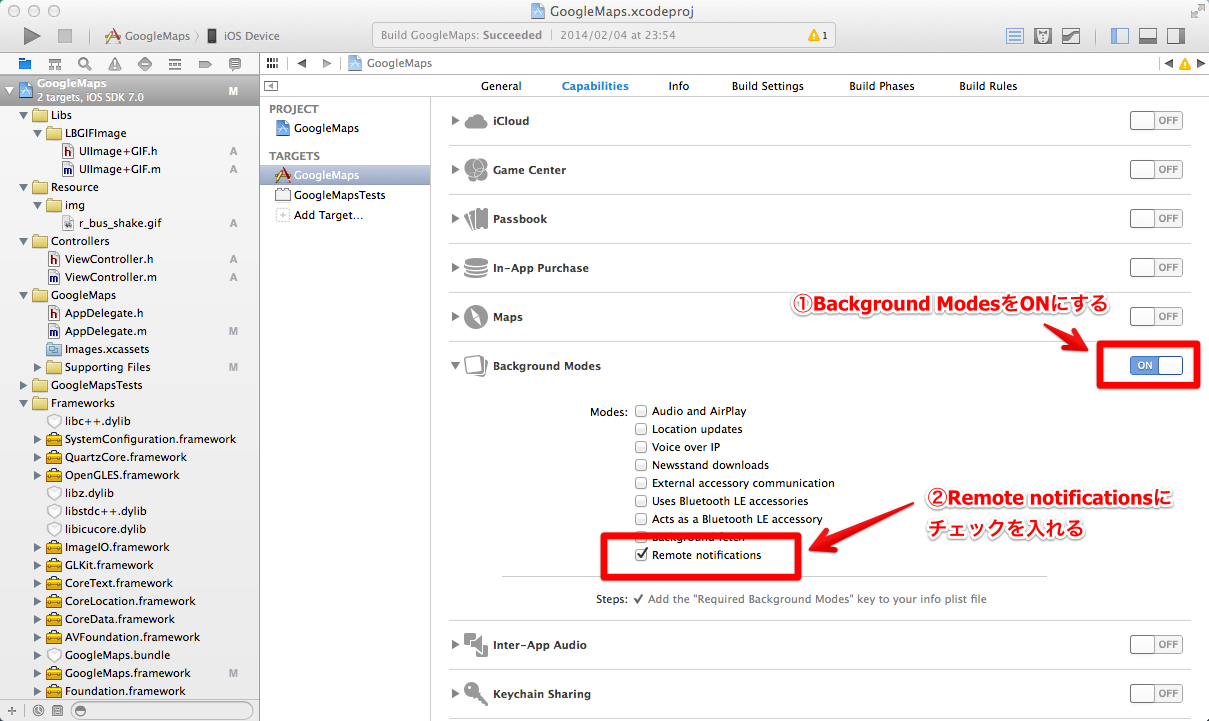
まずは、ネイティブソースとXcode5の設定から説明します。Xcode5でプロジェクトを作成したら、TARGETS > Capabilities > Background Modes > Remote notificationsにチェックを入れます。
続いてはネイティブソースでプッシュの受取り口を作りましょう。
1 2 3 4 | |
1 2 3 4 5 6 7 8 9 10 11 12 13 14 15 16 17 18 19 20 21 22 23 24 25 | |
プッシュ通知を受け取ったとき、上記に書いたdidReceiveRemoteNotification処理が実行されます。コメントアウトにも書いていますが、③がSilent Remote Notificationが届いたときに通る処理です。
ただし、Silent Remote NotificationはiOS7以上でないと対応していないのでiOS6の場合は通常のRemote Notification, Silent Remote Notificationに関わらず②のdidReceiveRemoteNotificationを通りますので、ご注意ください。
あとは③に実行させたい処理を書けば、Silent Remote Notificationの実装は完了です。
動作確認用に簡単にプッシュ通知を送る処理を書こう
さて、ネイティブ側の実装はできましたが、本当にこれで送れるのか確認したいですよね?Node.jsのnode-apnモジュールを使えば驚くほど簡単に用意することができます。
より簡単に作成するためにExpressモジュールを使って説明します。Expressモジュールの用意については第3回 Express.jsを使ったWebアプリケーションを構築を参照ください。
それではpushtestという名前のWebアプリの雛形を作成しましょう。
1
| |
次にpushtest配下で
1
| |
を実行して必要なモジュールをインストールしましょう。さらに、node-apnモジュールもインストールしましょう。また後ほど利用するquerystringモジュールもインストールしておきましょう。
1 2 | |
これでモジュールが揃ったので、app.jsを編集しましょう。
pushtest/routes/apns.jsを作成しておきます。(デフォルトで作成されるindex.jsかuser.jsをコピーしてファイル名を変更すればOKです)
1 2 3 4 5 6 7 8 9 10 11 | |
そしてお待ちかねのプッシュメイン処理をapns.jsに書いていきます。
1 2 3 4 5 6 7 8 9 10 11 12 13 14 15 16 17 18 19 20 21 22 23 24 25 | |
先ほどインストールしたqsはGETパラメータをオブジェクト化してくれる便りなモジュールです。詳しくはNode.js Manual&Documentsを参照してください。
まず、①のようにトークン値を取得します。
次に②のようにプッシュ通知を送るための設定を書きます。GitHubで公開されているReferenceをほぼそのまま書くだけなので簡単です。
注意しておきたいのはSilent Remote Notificationの場合はnote.contentAvailable=1(note.newsstandAvailable=1でも可)を設定する必要があります。逆にbadge, alert, soundは不要です。これらを入れてもプッシュ通知ができないわけではないのですが、冒頭に述べたユーザに気づかれずにという要件を満たせなくなります。
因みに, optionsで設定しているcertとkeyは証明書の保存場所です。上記ソースで設定している場所はapp.jsと同じ階層にkeyフォルダがあることを指します。また、gatewayにはsandboxをつけることを忘れずに。(商用の場合はsandboxは不要です。develop用ではsandboxを設定するんです。)
証明書(cert.pemとkey.pem)の作成は多くのサイトで説明されているのでここでは割愛します。
ここまで準備ができたら、
1
| |
でWeb&APサーバをローカルに起動しましょう。
そして、『localhost:3000?token=トークン値』をブラウザのアドレス部分に打って、Silent Remote Notificationを送りましょう!!
トークン値はネイティブソース内のdidRegisterForRemoteNotificationsWithDeviceToken関数でLogとして出力しているはずなので、コピーしましょう。
届きましたでしょうか?