はじめに
実に3年半ほど前のブログを始めた当初、Mapに好きな画像を配置しよう!といった記事を書いたことがありました。
駆け出しのiOSエンジニアであった当時の筆者はお世辞にもObjective-CやiOS自体について詳しいとは言い難きスキルレベルでした。
(当時のブログ記事に不必要な記述があるかとは思いますが、あえてそのまま残しています。)
それから月日を経て、Swiftで同じ実装をするタイミングがあったことで、本記事を書こうと思い、今に至ります。
簡単な内容ではありますが、感慨深く書かせて頂いています笑
CustomAnnotationを作成しよう
当時と同じ手法で実装してみます。
1
2
3
4
5
6
7
8
9
10
11
12
13
14
15
16
| import Foundation
import MapKit
class CustomAnnotation:NSObject, MKAnnotation {
public var coordinate: CLLocationCoordinate2D
public var title: String?
public var subtitle: String?
init(coordinate: CLLocationCoordinate2D, title: String, subtitle: String) {
self.coordinate = coordinate
self.title = title
self.subtitle = subtitle
super.init()
}
}
|
上記では、MKAnnotationを拡張し、coordinate / title / subtitleを初期化時に一斉に設定できるようなイニシャライザを用意しました。
Mapに画像を配置しよう
さて、ではMapに画像を配置する方法を見ていきます。
1
2
3
4
5
6
7
8
9
10
11
12
13
14
15
16
17
18
19
20
21
22
23
24
25
26
27
28
29
30
31
32
33
34
35
36
37
38
39
40
| import UIKit
import MapKit
class ViewController: UIViewController, MKMapViewDelegate {
@IBOutlet weak var mapView: MKMapView!
override func viewDidLoad() {
super.viewDidLoad()
// マップ関連の初期化処理
self.mapView.delegate = self
self.mapView.setUserTrackingMode(MKUserTrackingMode.followWithHeading, animated: true)
// CustomAnnotationの初期化
let ann = CustomAnnotation.init(coordinate: CLLocationCoordinate2D.init(latitude: 35.685623, longitude: 139.763153), title: "TEST", subtitle: "test")
// CustomAnnotationをマップに配置
self.mapView.addAnnotation(ann)
}
<省略>
// MARK: MKMapViewDelegate
func mapView(_ mapView: MKMapView, viewFor annotation: MKAnnotation) -> MKAnnotationView? {
if (annotation is MKUserLocation) {
// ユーザの現在地の青丸マークは置き換えない
return nil
} else {
// CustomAnnotationの場合に画像を配置
let identifier = "Pin"
var annotationView: MKAnnotationView? = mapView.dequeueReusableAnnotationView(withIdentifier: identifier)
if annotationView == nil {
annotationView = MKAnnotationView.init(annotation: annotation, reuseIdentifier: identifier)
}
annotationView?.image = UIImage.init(named: "xxxx") // 任意の画像名
annotationView?.annotation = annotation
annotationView.canShowCallout = true // タップで吹き出しを表示
return annotationView
}
}
}
|
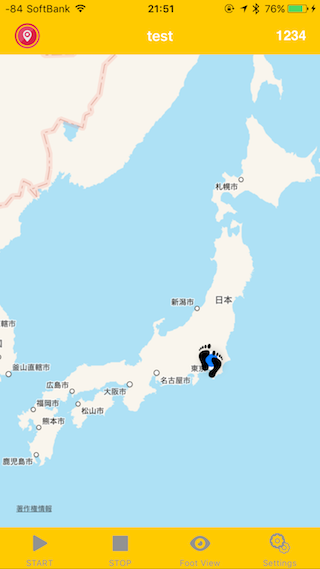
結果は次のようになります。
まとめ
昔は様々なサイトを参考にしながら、解読しながら書いていたソースがすんなりと書くことができました。
今回の記事を通して、もっと他にもSwiftに書き直しても良い記事がありそうだなと思いました。
まあ、タイミング見てですかね…といったところで本日はここまで。