今注目のサーバーサイドSwift
本日はサーバーサイドSwiftのWebフレームワークの1つであるSwift Expressを紹介したいと思います。
近年、AppleからSwiftのOSS化が発表されたことで一気に動き出したのがGitHub上でのWebフレームワーク作成合戦です。
筆者が知っているだけでも、
などが上げられます。
そんな中、筆者の目に止まったのが、 Swift Express でした。
本ブログでも度々 Node.js を触ったことがあると述べてきたように、筆者は Node.js でサーバサイド実装の経験があります。
その際に利用していたWebフレームワークにExpressというものがありました。
Expressは Node.js でいとも簡単にベースとなるサーバサイド実装を提供してくれます。
Swiftの経験はあるものの、サーバサイドSwiftの実装経験がない筆者にとっては『願ってもないWebフレームワークじゃないか!』ということで Swift Express に惹かれたのです。
さて、本日はそんな Swift Express を見ていきたいと思います。
Swift Expressをインストールしよう
まずは、Swift Expressをインストールしてみます。
homebrewでインストールします。
1
2
3
4
5
| // 手順(1)
brew tap crossroadlabs/tap
// 手順(2)
brew install swift-express
|
手順(1)を実行すると、下記のように結果が表示されます。
1
2
3
4
5
6
7
8
| ==> Tapping crossroadlabs/tap
Cloning into '/usr/local/Library/Taps/crossroadlabs/homebrew-tap'...
remote: Counting objects: 8, done.
remote: Compressing objects: 100% (7/7), done.
remote: Total 8 (delta 0), reused 6 (delta 0), pack-reused 0
Unpacking objects: 100% (8/8), done.
Checking connectivity... done.
Tapped 2 formulae (34 files, 72.7K)
|
続いて、手順(2)を実行すると、下記のように結果が表示されます。
1
2
3
4
5
6
7
8
9
10
11
12
13
14
15
16
17
18
19
20
21
22
23
24
25
26
27
28
29
30
31
32
33
34
35
36
37
38
39
40
41
42
43
44
45
46
47
48
49
50
51
52
53
54
55
56
57
58
59
60
61
62
63
64
65
66
67
68
69
70
71
72
73
74
75
76
77
78
79
80
81
82
83
84
| ==> Installing swift-express from crossroadlabs/tap
==> Installing dependencies for crossroadlabs/tap/swift-express: openssl, cmake, libevent, libevhtp, carthage
==> Installing crossroadlabs/tap/swift-express dependency: openssl
==> Downloading https://homebrew.bintray.com/bottles/openssl-1.0.2h_1.el_capitan.bottle.tar.gz
######################################################################## 100.0%
==> Pouring openssl-1.0.2h_1.el_capitan.bottle.tar.gz
==> Caveats
A CA file has been bootstrapped using certificates from the system
keychain. To add additional certificates, place .pem files in
/usr/local/etc/openssl/certs
and run
/usr/local/opt/openssl/bin/c_rehash
This formula is keg-only, which means it was not symlinked into /usr/local.
Apple has deprecated use of OpenSSL in favor of its own TLS and crypto libraries
Generally there are no consequences of this for you. If you build your
own software and it requires this formula, you'll need to add to your
build variables:
LDFLAGS: -L/usr/local/opt/openssl/lib
CPPFLAGS: -I/usr/local/opt/openssl/include
==> Summary
🍺 /usr/local/Cellar/openssl/1.0.2h_1: 1,691 files, 12M
==> Installing crossroadlabs/tap/swift-express dependency: cmake
==> Downloading https://homebrew.bintray.com/bottles/cmake-3.6.0.el_capitan.bottle.tar.gz
######################################################################## 100.0%
==> Pouring cmake-3.6.0.el_capitan.bottle.tar.gz
==> Caveats
Emacs Lisp files have been installed to:
/usr/local/share/emacs/site-lisp/cmake
==> Summary
🍺 /usr/local/Cellar/cmake/3.6.0: 2,028 files, 27.8M
==> Installing crossroadlabs/tap/swift-express dependency: libevent
==> Downloading https://homebrew.bintray.com/bottles/libevent-2.0.22.el_capitan.bottle.tar.gz
######################################################################## 100.0%
==> Pouring libevent-2.0.22.el_capitan.bottle.tar.gz
🍺 /usr/local/Cellar/libevent/2.0.22: 53 files, 1.6M
==> Installing crossroadlabs/tap/swift-express dependency: libevhtp
==> Downloading https://github.com/ellzey/libevhtp/archive/1.2.10.tar.gz
==> Downloading from https://codeload.github.com/ellzey/libevhtp/tar.gz/1.2.10
######################################################################## 100.0%
Warning: SHA1 support is deprecated and will be removed in a future version.
Please switch this formula to SHA256.
==> cmake . -DEVHTP_DISABLE_REGEX:STRING=ON -DEVHTP_BUILD_SHARED:STRING=ON -DCMAKE_C_FLAGS_RELEASE=-DNDEBUG -DCMAKE_CXX_FLAGS_RELEASE=-DNDEBUG -DCMAKE_INSTALL_PREFIX=/usr/local/Cell
==> make install
🍺 /usr/local/Cellar/libevhtp/1.2.10: 9 files, 151.5K, built in 48 seconds
==> Installing crossroadlabs/tap/swift-express dependency: carthage
==> Downloading https://homebrew.bintray.com/bottles/carthage-0.17.2.el_capitan.bottle.tar.gz
######################################################################## 100.0%
==> Pouring carthage-0.17.2.el_capitan.bottle.tar.gz
🍺 /usr/local/Cellar/carthage/0.17.2: 45 files, 11.9M
==> Installing crossroadlabs/tap/swift-express
==> Cloning https://github.com/crossroadlabs/ExpressCommandLine.git
Cloning into '/Users/kato_takahiro/Library/Caches/Homebrew/swift-express--git'...
remote: Counting objects: 67, done.
remote: Compressing objects: 100% (63/63), done.
remote: Total 67 (delta 21), reused 25 (delta 1), pack-reused 0
Unpacking objects: 100% (67/67), done.
Checking connectivity... done.
Note: checking out 'fae821f4d52c9dfb4e4c34ab0a4297ea700c9db1'.
You are in 'detached HEAD' state. You can look around, make experimental
changes and commit them, and you can discard any commits you make in this
state without impacting any branches by performing another checkout.
If you want to create a new branch to retain commits you create, you may
do so (now or later) by using -b with the checkout command again. Example:
git checkout -b <new-branch-name>
==> Checking out tag 0.2.2
==> carthage update --platform Mac --no-use-binaries --no-build
==> rm -rf Carthage/Checkouts/Commandant/Carthage/Checkouts/Nimble Carthage/Checkouts/Commandant/Carthage/Checkouts/Quick
==> carthage build --platform Mac
==> xcodebuild SYMROOT=build
==> Caveats
.app bundles were installed.
Run `brew linkapps swift-express` to symlink these to /Applications.
==> Summary
🍺 /usr/local/Cellar/swift-express/0.2.2: 30 files, 7.3M, built in 3 minutes 5 seconds
|
さて、見過ごしがちですが、
最後の方に『brew linkapps swift-express to symlink these to /Applications.』と書かれているので、
brew linkapps swift-expressを実行しておきましょう。
ここまで来たら、swift-expressを実行してください。
1
2
3
4
5
6
7
8
9
| Available commands:
bootstrap download and build Express project dependencies
build build Express project
help Display general or command-specific help
init Creates new Express application project
run run Express project
update update and build Express project dependencies
version Display the current version of Swift Express Command Line
|
のようにコマンド種別が表示されたら、正しく Swift Express がインストールされた証拠です。
Swift Expressのプロジェクトを作ろう!
Swift Expressのインストールが完了したので、早速プロジェクト作成しましょう。
1
2
3
4
5
6
7
8
| // 手順(1)
swift-express init <プロジェクト名>
// 手順(2)
cd <プロジェクト名>
// 手順(3)
swift-express bootstrap
|
手順(1)を実行すると、下記の結果が表示されます。
1
2
3
4
5
6
7
| Cloning into '/var/folders/hj/p9y9d00s3sb5nn_x04961z2m0000gn/T/swift-express-827699'...
remote: Counting objects: 124, done.
remote: Total 124 (delta 0), reused 0 (delta 0), pack-reused 124
Receiving objects: 100% (124/124), 79.66 KiB | 0 bytes/s, done.
Resolving deltas: 100% (33/33), done.
Checking connectivity... done.
Task: "init" done.
|
続いて、手順(2)で作成したプロジェクトフォルダ配下に移動すると、
1
2
3
4
5
6
7
8
9
10
11
12
13
| HelloExpress
┣━━ Cartfile
┣━━ HelloExpress.xcodeproj
┣━━ Info.plist
┣━━ Package.swift
┣━━ app
┃ ┗━━ main.swift
┣━━ dist
┣━━ public
┃ ┣━━ css
┃ ┃ ┗━━ main.css
┃ ┗━━ logo.png
┗━━ views
|
といった形で構成されていることを確認できます。
最後に手順(3)を実行すると、下記の結果が表示されます。
(ここが最も時間のかかる工程になります。)
1
2
3
4
5
6
7
8
9
10
11
12
13
14
15
16
17
18
19
20
21
22
23
24
25
26
27
28
| *** No Cartfile.resolved found, updating dependencies
*** Cloning Express
*** Cloning Stencil
*** Cloning GRMustache.swift
*** Cloning CEVHTP
*** Cloning PathToRegex
*** Cloning Regex
*** Cloning TidyJSON
*** Cloning BrightFutures
*** Cloning PathKit
*** Cloning ExecutionContext
*** Cloning Result
*** Checking out CEVHTP at "0.1.0"
*** Checking out ExecutionContext at "0.3.1"
*** Checking out Result at "1.0.3"
*** Checking out GRMustache.swift at "bf7d6031d7e0dd862519eaba2b36b2e11a0d25a9"
*** Checking out Regex at "0.5.2"
*** Checking out PathToRegex at "0.2.2"
*** Checking out PathKit at "0.6.1"
*** Checking out BrightFutures at "0.4.0"
*** Checking out Stencil at "0.5.3"
*** Checking out Express at "0.3.6"
*** Checking out TidyJSON at "1.1.0"
<省略>
/Users/******/****/HelloExpress/Carthage/Checkouts/Express/Express/Content.swift:39:5: warning: use of 'typealias' to declare associated types is deprecated; use 'associatedtype' instead
Task: "bootstrap" done.
|
これでプロジェクトの作成は完了です。
プロジェクトを実行してみよう!
先ほど作成したプロジェクトを実行してみたいと思います。
1
2
3
4
5
| // 手順(1)
swift-express build
// 手順(2)
swift-express run
|
早速、ビルドを実行するために手順(1)のコマンドを叩いてください。
すると、
1
2
3
4
5
6
7
8
9
10
11
| Building HelloExpress in Debug mode...
<省略>
=== BUILD TARGET HelloExpress OF PROJECT HelloExpress WITH CONFIGURATION Debug ===
<省略>
** BUILD SUCCEEDED **
Task: "build" done.
|
という結果が表示されます。
問題がなければBUILD SUCCEEDEDが表示されるはずです。
ビルドが成功したら、手順(2)を実行しましょう。
すると、
1
2
| Running HelloExpress...
Express was successfully launched on port 9999
|
のように表示されます。デフォルトでポート番号が 9999 になっていることがわかると思います。
http://localhost:9999にアクセスしてみると、

という画面が得られます。
因みにですが、XcodeからもBuild&Runはできます。
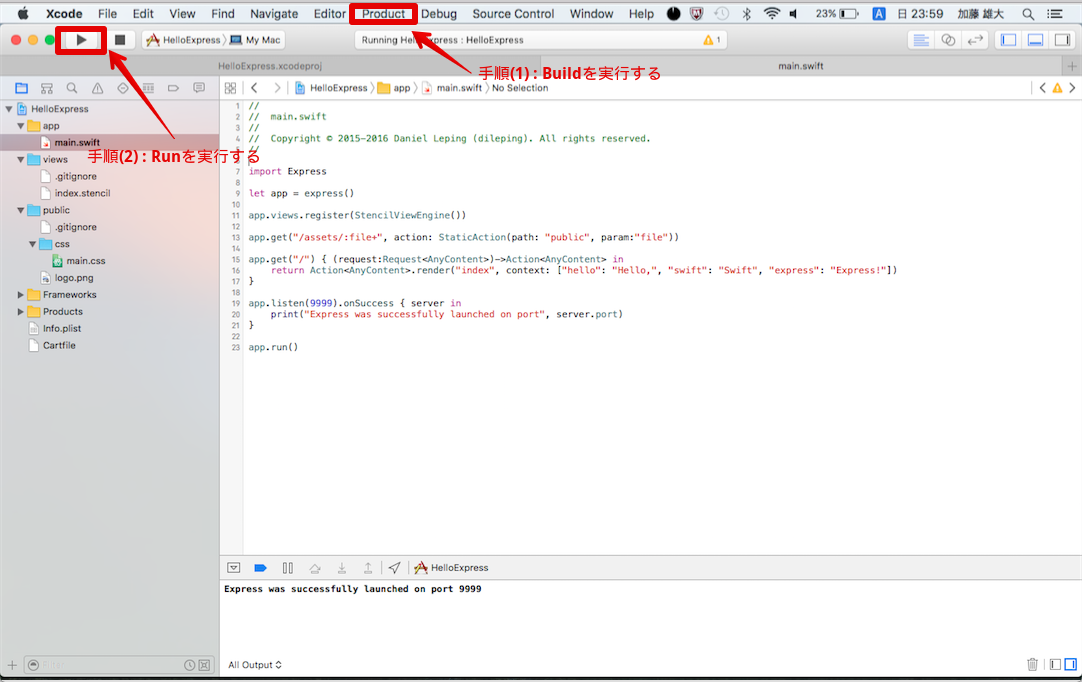
Swift Expressの中身を見てみよう!
最後にざっくり中身のソースを見てみようと思います。
Swift Expressのメインソースであるmain.swiftを見てみます。
1
2
3
4
5
6
7
8
9
10
11
12
13
14
15
16
17
18
19
20
21
22
23
| // app/main.swift
import Express
let app = express()
// (1)
app.views.register(StencilViewEngine())
// (2)
app.get("/assets/:file+", action: StaticAction(path: "public", param:"file"))
// (3)
app.get("/") { (request:Request<AnyContent>)->Action<AnyContent> in
return Action<AnyContent>.render("index", context: ["hello": "Hello,", "swift": "Swift", "express": "Express!"])
}
// (4)
app.listen(9999).onSuccess { server in
print("Express was successfully launched on port", server.port)
}
app.run()
|
これは Node.js 経験者としてはかなりExpressに酷似してるなと感じます。
順に追ってみていきます。
(1): 描画エンジンを設定しています。
Node.jsのExpressで言うところの、
1
2
| app.set('views', path.join(__dirname, 'views'));
app.set('view engine', 'jade');
|
に該当します。
(2): 静的ファイルの格納場所を設定しています。
Node.jsのExpressで言うところの、
1
| app.use(express.static(path.join(__dirname, 'public')));
|
に該当します。
(3): リクエストのアクションパスと処理を設定しています。
Node.jsのExpressで言うところの、
1
2
3
4
5
6
7
| // app.js
app.use('/', routes);
// route/index.js
router.get('/', function(req, res, next) {
res.render('index', { title: 'Express' });
}
|
に該当します。
(4): ポート番号を設定しています。
Node.jsのExpressで言うところの、
1
2
3
4
5
6
7
8
9
10
11
12
13
14
15
16
17
| // bin/www
var port = normalizePort(process.env.PORT || '3000');
app.set('port', port);
var server = http.createServer(app);
server.listen(port);
server.on('listening', onListening);
function onListening() {
var addr = server.address();
var bind = typeof addr === 'string'
? 'pipe ' + addr
: 'port ' + addr.port;
debug('Listening on ' + bind);
}
|
に該当します。
まとめ
さて如何でしたでしょうか?
これだけNode.jsのExpressに似ているのですから、
Swift Express はこれからサーバサイドSwiftを学んでいく上で強力なWebフレームワークとなるかもしれません。
新しくNode.jsを学ぶ人も将来的にサーバサイドSwiftを触る機会が出てくるかもしれませんので知っておいて損はないでしょう。
筆者もこれまら益々注目されるであろうサーバサイドSwiftの情報は追っていきたいと思います。