volley frameworkを使ったプロジェクトをGitHubにアップする
本日はAndroidについて書きます。
Androidアプリを開発する上で、通信系のframeworkを使うなら、volley frameworkを選択すると思います。
非常に便利なframworkである反面、導入が面倒だったりします。
筆者はiOSエンジニアなので、CocoaPodsをよく使うのですが、如何に便利なツールなのかがよくわかりました笑
プロジェクトの作成
まずは、Android Studioでプロジェクトを作成して、GitHubにアップしましょう。
- Android Studioでプロジェクトを作成(VolleySampleを作成)
- GitHubで新規repogitoryを作成
- Android Studioのプロジェクトのルート(VolleySample/)配下に移動して、下記コマンドを実行しましょう。
1
2
3
4
5
6
| $ echo "# VolleySample" >> README.md
$ git init
$ git add .
$ git commit -m "first commit"
$ git remote add origin https://github.com/grandbig/VolleySample.git
$ git push -u origin master
|
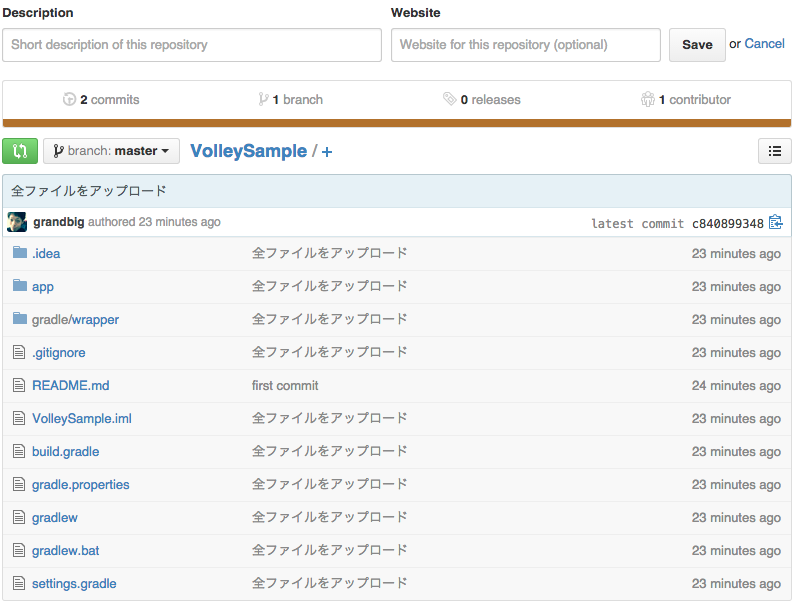
下記のようになればOKです。

volleyの導入
次にvolley frameworkを自身のプロジェクトに導入します。
導入にはgit submoduleを使います。
先ほど作成したAndroid Studioプロジェクトのルート(VolleySample/)配下で下記コマンドを実行
1
| $ git submodule add https://android.googlesource.com/platform/frameworks/volley modules/volley
|
これにより、VolleySample/.gitmodulesが作成されます。
中身はというと、
1
2
3
| [submodule "modules/volley"]
path = modules/volley
url = https://android.googlesource.com/platform/frameworks/volley
|
になっているはずです。
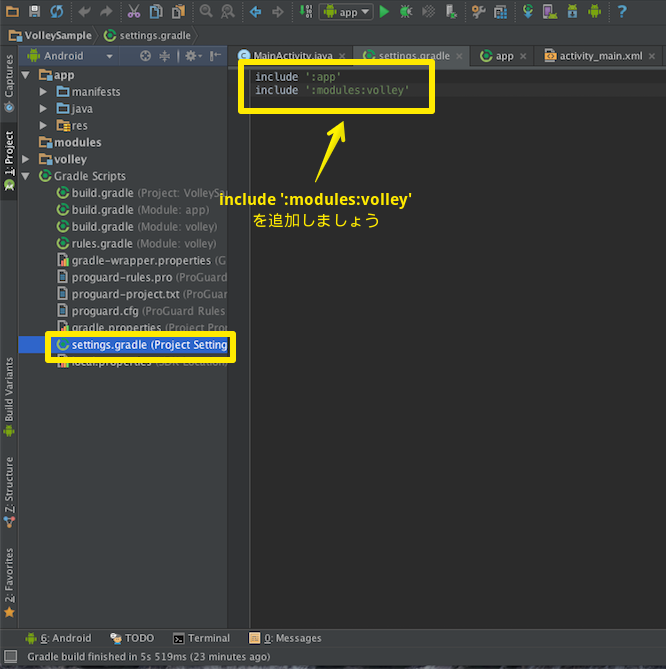
続いて、settings.gradle(Project Settings)に下記1行を追加します。
1
| include ':modules:volley'
|

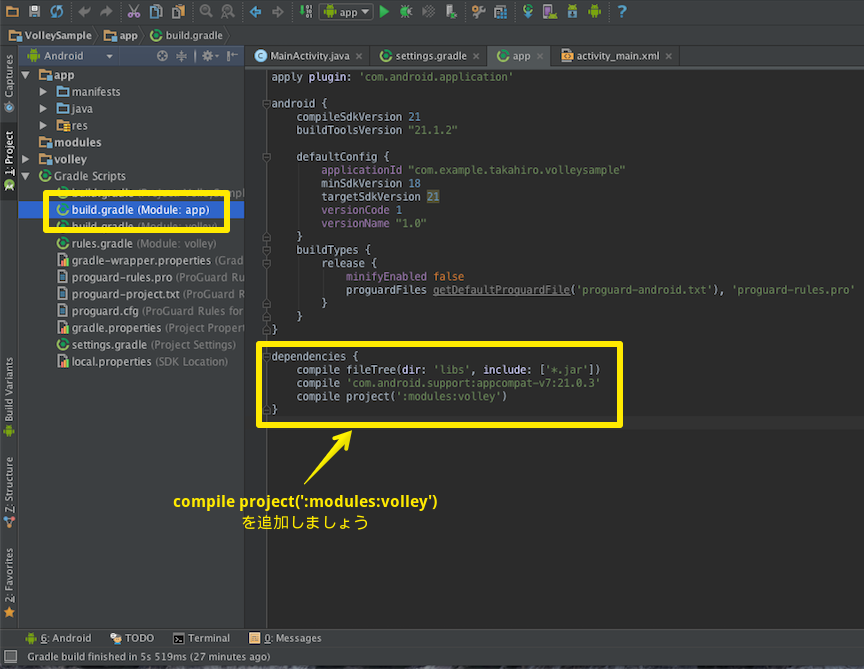
そして、build.gradle(Module: app)のdependenciesに1行追加しましょう。
1
2
3
4
5
| dependencies {
compile fileTree(dir: 'libs', include: ['*.jar'])
compile 'com.android.support:appcompat-v7:21.0.3'
compile project(':modules:volley') .... ここを追加しましょう
}
|

ここまできたら、一旦、GradleをSyncさせましょう。
足りないものがあればインストールを求められるはずなので、その場合はインストールしておきましょう。
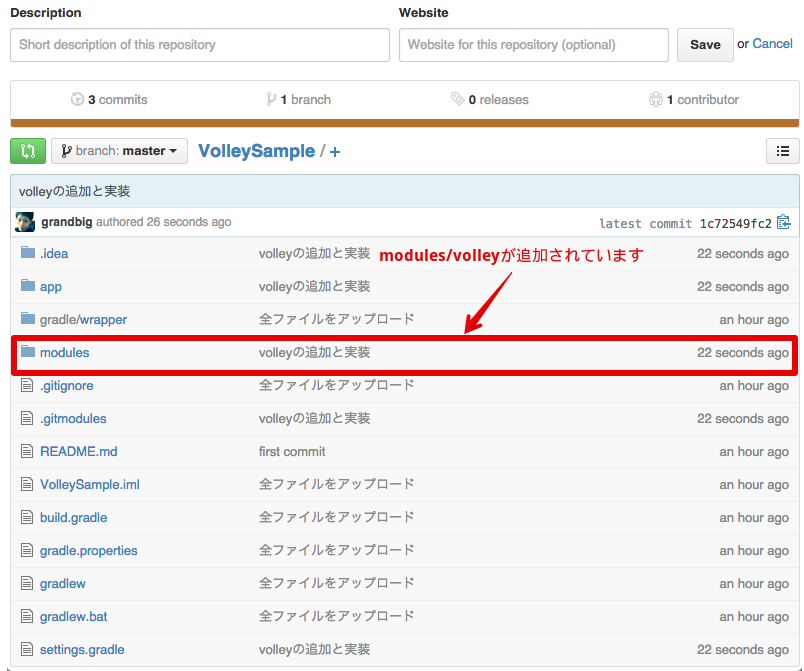
では、GitHubにこれまでの作業分を更新させましょう。

volleyの利用
実際にvolleyを使ってみましょう。
Swift Alamofireライブラリを使ってみよう!とSwift AFNetworkingライブラリを使ってみよう!で例として使ったOpen Weather Map APIをここでも利用します。
1
2
3
4
5
6
7
8
9
10
11
12
13
14
15
16
17
18
19
20
21
22
23
24
25
26
27
28
29
30
31
32
33
34
35
36
37
38
39
40
41
42
43
44
45
46
47
48
49
50
51
52
| // MainActivity.java
package com.example.takahiro.volleysample;
import android.support.v7.app.ActionBarActivity;
import android.os.Bundle;
import android.util.Log;
import android.view.Menu;
import android.view.MenuItem;
import com.android.volley.Request;
import com.android.volley.RequestQueue;
import com.android.volley.VolleyError;
import com.android.volley.Response;
import com.android.volley.toolbox.JsonObjectRequest;
import com.android.volley.toolbox.Volley;
import org.json.JSONObject;
public class MainActivity extends ActionBarActivity {
private RequestQueue mRequestQueue;
@Override
protected void onCreate(Bundle savedInstanceState) {
super.onCreate(savedInstanceState);
setContentView(R.layout.activity_main);
if (mRequestQueue == null) {
mRequestQueue = Volley.newRequestQueue(getApplicationContext());
}
// URLの指定
String url = "http://api.openweathermap.org/data/2.5/weather?q=Tokyo,jp";
mRequestQueue.add(new JsonObjectRequest(Request.Method.GET, url, null, new Response.Listener<JSONObject>() {
@Override
public void onResponse(JSONObject response) {
// 通信に成功した場合
Log.d("VolleySample", response.toString());
}
}, new Response.ErrorListener() {
@Override
public void onErrorResponse(VolleyError error) {
// エラーが発生した場合
Log.d("VolleySample", error.toString());
}
});
}
<省略>
}
|
因みに、AndroidManifest.xmlにインターネットの通信許可を与えることを忘れずに。
1
2
3
4
5
6
7
8
9
10
11
| // AndroidManifest.xml
<?xml version="1.0" encoding="utf-8"?>
<manifest xmlns:android="http://schemas.android.com/apk/res/android"
package="com.example.takahiro.volleysample" >
<uses-permission android:name="android.permission.INTERNET" />
<application
<省略>
</application>
</manifest>
|
無事、通信が成功しましたね!
ってところで本日はここまで。


