はじめに
前回に引き続き、Clean Swiftの実例サンプルについて書いていきたいと思います。
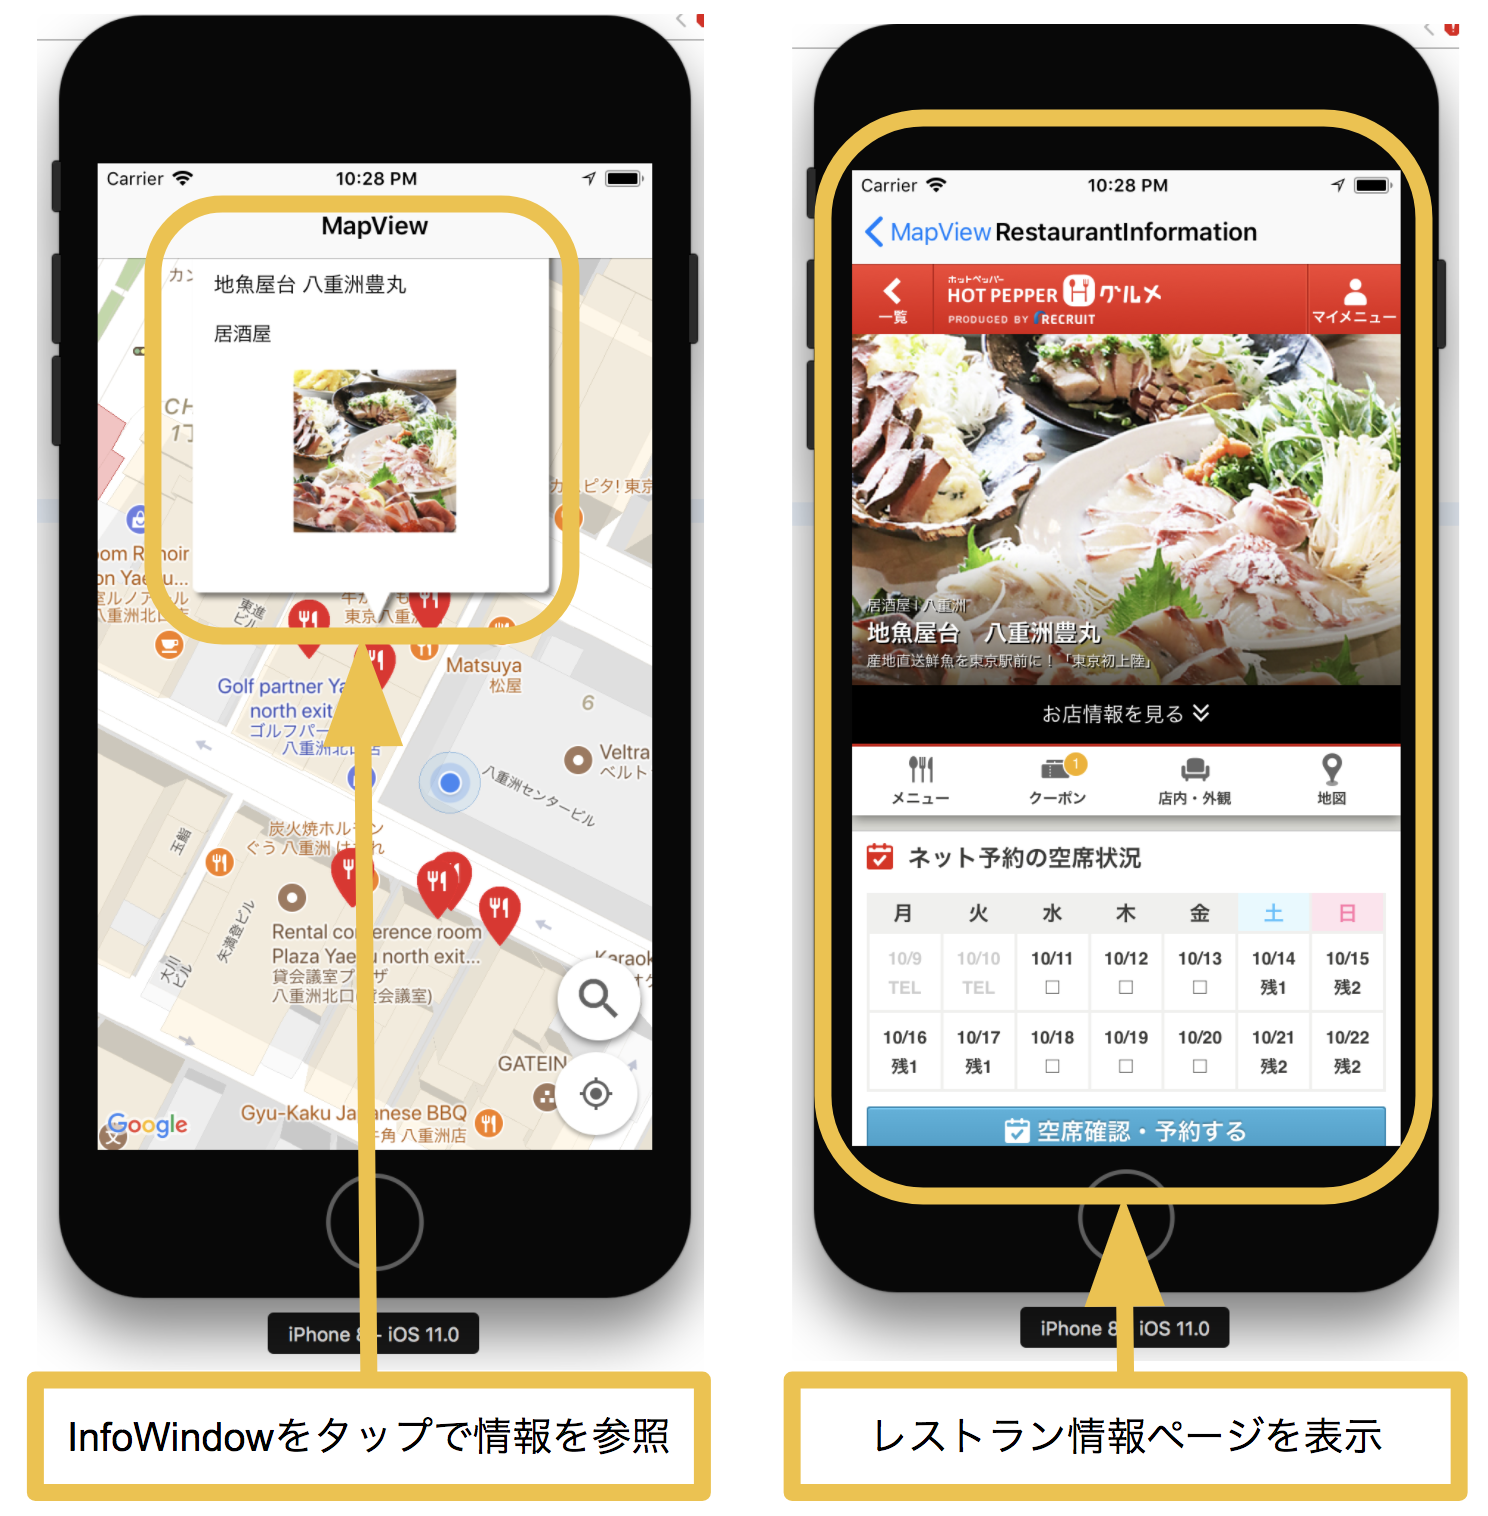
今回は、下記要件をアプリに追加して見ていきます。
アプリの追加要件
追加要件は以下です。
- マップのマーカをタップした後に表示されるInfoWindowをタップすると、レストラン情報ページに遷移する
フォルダ構成
1つ画面を追加することになったため、今回のフォルダ構成としては下記になります。
1
2
3
4
5
6
7
8
9
10
11
12
13
14
15
16
17
18
19
20
21
22
23
24
25
26
27
28
29
30
31
32
| CleanFoodLogger
├── Views
│ └── ViewController+Alert.swift
├── Models
│ ├── Restaurant.swift
│ └── CustomGMSMarker.swift
├── Workers
│ └── HotpepperWorker.swift
├── Services
│ └── HotpepperAPI.swift
├── Scenes
│ ├── MapView
│ │ ├── View
│ │ │ ├── CustomInfoWindow.xib
│ │ │ └── CustomInfoWindow.swift
│ │ ├── MapViewController.swift
│ │ ├── MapInteractor.swift
│ │ ├── MapModels.swift
│ │ ├── MapPresenter.swift
│ │ ├── MapRouter.swift
│ │ └── MapWorker.swift
│ ├── RestaurantInformation
│ │ ├── RestaurantInformationViewController.swift
│ │ ├── RestaurantInformationInteractor.swift
│ │ ├── RestaurantInformationModels.swift
│ │ ├── RestaurantInformationPresenter.swift
│ │ ├── RestaurantInformationRouter.swift
│ │ └── RestaurantInformationWorker.swift
├── AppDelegate.swift
├── Main.storyboard
├── Assets.xcassets
└── key.plist
|
アプリの実装
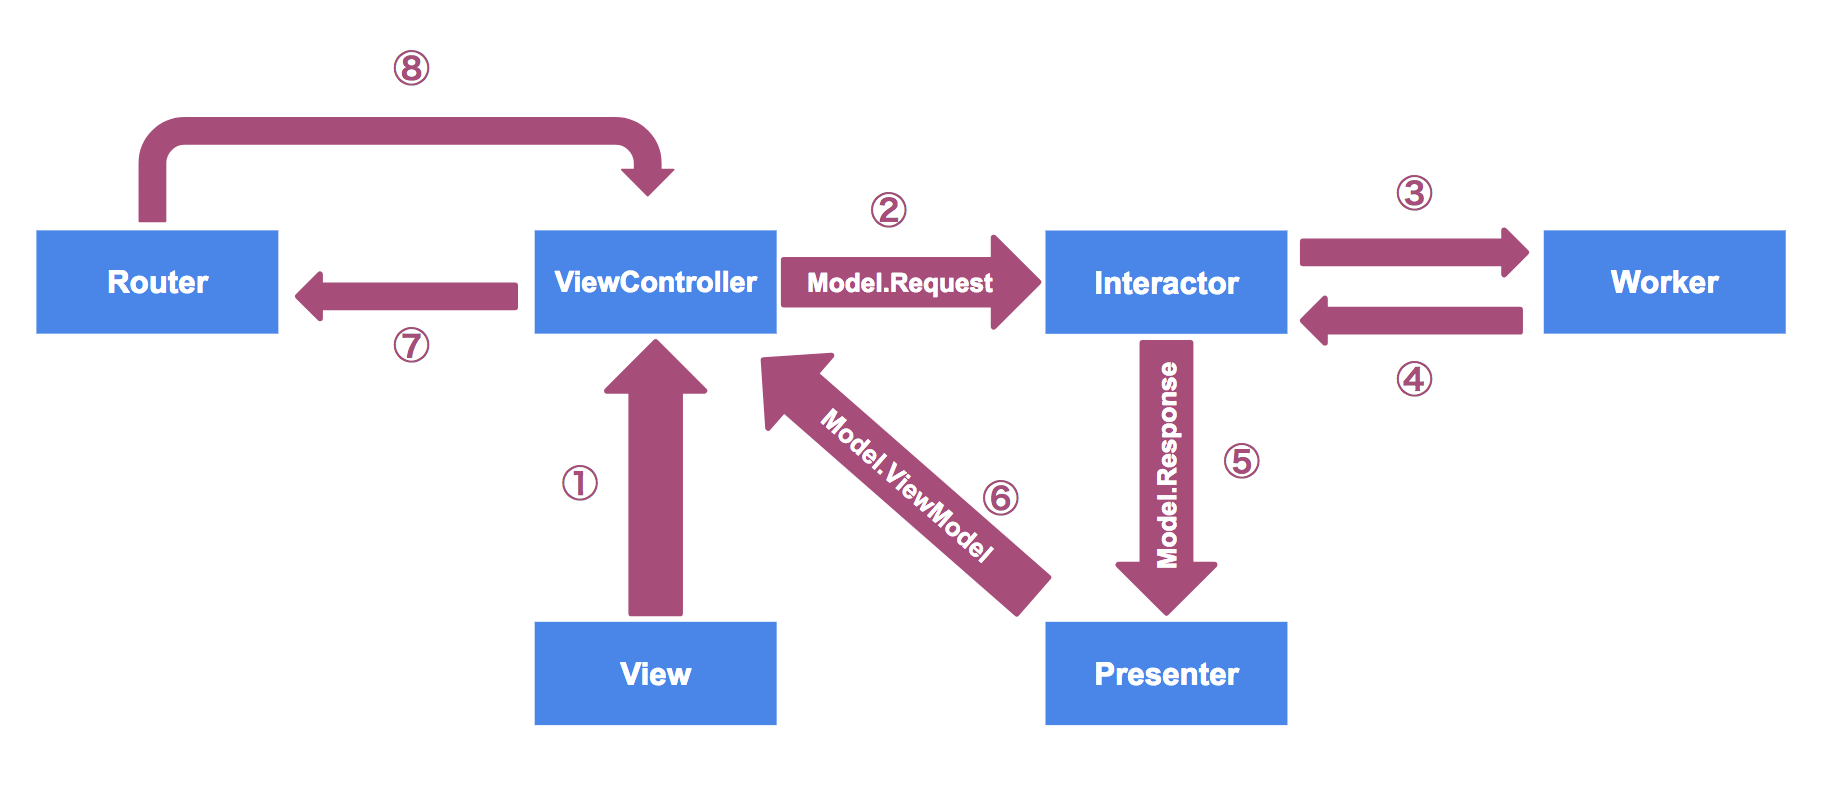
レストラン情報ページに遷移する機能に関しては下図のようなデータフローになります。
RestaurantInformation
今回追加したファイルはこのフォルダ配下のみになるので、ここのみ説明します。
RestaurantInformationModels.swift
Model は非常にシンプルです。
1
2
3
4
5
6
7
8
9
10
11
12
13
14
15
| import UIKit
enum RestaurantInformation {
enum Load {
struct Request {
}
struct Response {
var url: String
}
struct ViewModel {
var url: String
}
}
}
|
RestaurantInformationInteractor.swift
ViewController から受けた依頼を必要があれば Worker を経由して実行し、 Presenter にデータを渡します。
1
2
3
4
5
6
7
8
9
10
11
12
13
14
15
16
17
18
19
20
21
22
| import UIKit
protocol RestaurantInformationBusinessLogic {
func loadRestaurantInformation(request: RestaurantInformation.Load.Request)
}
protocol RestaurantInformationDataStore {
var urlString: String { get set }
}
class RestaurantInformationInteractor: RestaurantInformationBusinessLogic, RestaurantInformationDataStore {
var presenter: RestaurantInformationPresentationLogic?
var worker: RestaurantInformationWorker?
var urlString: String = ""
// MARK: Load restaurant information
func loadRestaurantInformation(request: RestaurantInformation.Load.Request) {
let response = RestaurantInformation.Load.Response(url: urlString)
presenter?.presentRestaurantInformation(response: response)
}
}
|
loadRestaurantInformation
- レストラン情報ページのURLが格納された
urlString を Presenter に渡します
RestaurantInformationPresenter.swift
Interactor から受け取ったデータを表示形式に変換して、ViewController に描画指示を出します。
今回は Interactor で保持した urlString を取得したかっただけなので、処理の出し分け等はなく、シンプルになっています。
1
2
3
4
5
6
7
8
9
10
11
12
13
14
15
16
| import UIKit
protocol RestaurantInformationPresentationLogic {
func presentRestaurantInformation(response: RestaurantInformation.Load.Response)
}
class RestaurantInformationPresenter: RestaurantInformationPresentationLogic {
weak var viewController: RestaurantInformationDisplayLogic?
// MARK: Present restaurant information
func presentRestaurantInformation(response: RestaurantInformation.Load.Response) {
let viewModel = RestaurantInformation.Load.ViewModel(url: response.url)
viewController?.displayRestaurantInformation(viewModel: viewModel)
}
}
|
RestaurantInformationViewController.swift
そして ViewController について説明します。
下記で
Interactor に具体的な処理内容(表示ロジック)を問い合わせるPresenter からの指示を受けて、最適な View を描画する
を実現しています。
1
2
3
4
5
6
7
8
9
10
11
12
13
14
15
16
17
18
19
20
21
22
23
24
25
26
27
28
29
30
31
32
33
34
35
36
37
38
39
40
41
42
43
44
45
46
47
48
49
50
51
52
53
54
55
56
57
58
59
60
61
62
63
64
65
66
67
68
69
70
71
72
73
74
75
76
77
78
79
80
81
82
83
84
85
86
87
88
89
90
91
| import UIKit
import WebKit
protocol RestaurantInformationDisplayLogic: class {
func displayRestaurantInformation(viewModel: RestaurantInformation.Load.ViewModel)
}
class RestaurantInformationViewController: UIViewController, RestaurantInformationDisplayLogic {
var interactor: RestaurantInformationBusinessLogic?
var router: (NSObjectProtocol & RestaurantInformationRoutingLogic & RestaurantInformationDataPassing)?
private var webView: WKWebView!
// MARK: Object lifecycle
override init(nibName nibNameOrNil: String?, bundle nibBundleOrNil: Bundle?) {
super.init(nibName: nibNameOrNil, bundle: nibBundleOrNil)
setup()
}
required init?(coder aDecoder: NSCoder) {
super.init(coder: aDecoder)
setup()
}
// MARK: Setup
private func setup() {
let viewController = self
let interactor = RestaurantInformationInteractor()
let presenter = RestaurantInformationPresenter()
let router = RestaurantInformationRouter()
viewController.interactor = interactor
viewController.router = router
interactor.presenter = presenter
presenter.viewController = viewController
router.viewController = viewController
router.dataStore = interactor
}
// MARK: Routing
override func prepare(for segue: UIStoryboardSegue, sender: Any?) {
if let scene = segue.identifier {
let selector = NSSelectorFromString("routeTo\(scene)WithSegue:")
if let router = router, router.responds(to: selector) {
router.perform(selector, with: segue)
}
}
}
// MARK: View lifecycle
override func viewDidLoad() {
super.viewDidLoad()
self.title = "RestaurantInformation"
configuraWebView()
loadRestaurantInformation()
}
// MARK: Configuration
private func configuraWebView() {
let webConfiguration = WKWebViewConfiguration()
let frame = CGRect(x: 0, y: 0, width: self.view.frame.width, height: self.view.frame.height)
webView = WKWebView(frame: frame, configuration: webConfiguration)
webView.uiDelegate = self
webView.navigationDelegate = self
self.view.addSubview(webView)
}
// MARK: Load restaurant information
func loadRestaurantInformation() {
let request = RestaurantInformation.Load.Request()
interactor?.loadRestaurantInformation(request: request)
}
func displayRestaurantInformation(viewModel: RestaurantInformation.Load.ViewModel) {
if let url = URL(string: viewModel.url) {
let urlRequest = URLRequest(url: url)
webView.load(urlRequest)
}
}
}
extension RestaurantInformationViewController: WKUIDelegate {
}
extension RestaurantInformationViewController: WKNavigationDelegate {
}
|
loadRestaurantInformation()
- レストラン情報の読み込みを
Interactor に依頼しています
displayRestaurantInformation(viewModel: RestaurantInformation.Load.ViewModel)
Presenter から受けた指示に従って描画を実行しています- ここでは指定URLを用いてWebページを表示しています
今回は RestaurantInformationRouter.swift および RestaurantInformationWorker.swift については特に具体的な処理がないため説明は省略します。
MapView
マップ上に表示されるInfoWindowをタップしないと、レストラン情報ページに遷移できない要件であるため、 MapView 配下も少々変更が必要です。
この変更をもって、RestaurantInformationInteractor 内で値の入った urlString を扱うことになります。
関係各所の変更内容も簡単に書いておきます。
Models
まずは Models/Restaurant.swift です。
1
2
3
4
5
6
7
8
9
10
11
12
13
14
| import Foundation
struct Restaurant: Equatable {
var id: String
var name: String
var category: String
var imageURL: String
var latitude: Double
var longitude: Double
var restaurantURL: String // 追記
}
<省略>
|
続いて Models/CustomGMSMarker.swift です。
1
2
3
4
5
6
7
8
9
10
11
12
13
14
15
16
| import Foundation
import GoogleMaps
class CustomGMSMarker: GMSMarker {
public var id: String!
public var name: String!
public var category: String!
public var imageURL: String!
public var restaurantURL: String! // 追記
/// 初期化
override init() {
super.init()
}
}
|
HotpepperAPI.swift
構造体である Restaurant に変更が入ったので、 Services/HotpepperAPI.swift にも修正が必要になります。
(返却値である Restaurant を生成する部分で restaurantURL を追加する必要があるためです。)
1
2
3
4
5
6
7
8
9
10
11
12
13
14
15
16
17
18
19
20
21
22
23
24
25
26
27
28
29
30
31
| import Foundation
import Alamofire
import SwiftyJSON
class HotpepperAPI: HotpepperProtocol {
func fetchRestaurants(latitude: Double, longitude: Double, completionHandler: @escaping ([Restaurant], HotpepperError?) -> Void) {
let parameters = ["key": self.apiKey, "format": "json", "lat": latitude, "lng": longitude, "range": 3] as [String : Any]
Alamofire.SessionManager.default.requestWithoutCache(baseURL, method: .get, parameters: parameters, encoding: URLEncoding.default, headers: nil).responseJSON { response in
var restaurants: [Restaurant] = [Restaurant]()
<省略>
for shop in shops {
let id = shop["id"].string ?? "ID不明"
let name = shop["name"].string ?? "ショップ名不明"
let category = shop["genre"]["name"].string ?? "カテゴリ不明"
let imageURL = shop["photo"]["mobile"]["l"].string ?? ""
let latitude = atof(shop["lat"].string ?? "0")
let longitude = atof(shop["lng"].string ?? "0")
// ここから修正
let restaurantURL = shop["urls"]["pc"].string ?? ""
let restaurant = Restaurant(id: id, name: name, category: category, imageURL: imageURL, latitude: latitude, longitude: longitude, restaurantURL: restaurantURL)
// ここまで修正
restaurants.append(restaurant)
}
completionHandler(restaurants, nil)
}
}
|
MapModels.swift
レストラン情報ページを見るために、 url を受け渡す必要があります。
その処理を実行するために Fetch を追加しています。
1
2
3
4
5
6
7
8
9
10
11
12
13
14
15
16
17
18
| import UIKit
enum Map {
<省略>
// MARK: Fetch restaurant information
enum Fetch {
struct Request {
var urlString: String
}
struct Response {
}
struct ViewModel {
}
}
}
|
MapInteractor.swift
MapInteractor.swift では重要な変更を入れています。
1
2
3
4
5
6
7
8
9
10
11
12
13
14
15
16
17
18
19
20
21
22
23
24
25
26
27
28
29
| import UIKit
protocol MapBusinessLogic {
func initMapView(request: Map.Init.Request)
func searchRestaurants(request: Map.Search.Request)
func fetchRestaurantInformation(request: Map.Fetch.Request) // 追記
}
protocol MapDataStore {
var urlString: String { get set } // 追記
}
class MapInteractor: MapBusinessLogic, MapDataStore {
var presenter: MapPresentationLogic?
var worker = HotpepperWorker(hotpepper: HotpepperAPI())
var urlString: String = "" // 追記
private var initView: Bool = false
<省略>
// 以下、追記
// MARK: Tap infoWindow
func fetchRestaurantInformation(request: Map.Fetch.Request) {
urlString = request.urlString
let response = Map.Fetch.Response()
presenter?.presentFetchedRestaurantInformation(response: response)
}
}
|
fetchRestaurantInformation(request: Map.Fetch.Request)
- マーカのInfoWindowをタップした際に、どのレストラン情報ページを表示すべきか把握する必要があります
- そのため、
Map.Fetch.Request に格納された urlString を MapDataStore で定義された urlString に入力しています
MapDataStore.urlString
- 画面遷移時に値の受け渡しが必要な場合は
DataStore プロトコルにフィールドを定義します
- 画面内で共通して使いまわしたい場合にも定義しておくと良いでしょう
MapPresenter.swift
一連の処理の流れ( ViewController → Interactor → Presenter )を書くために、具体的な実行処理はないものの、 Presenter を追加しています。
1
2
3
4
5
6
7
8
9
10
11
12
13
14
15
16
17
18
19
20
21
| import UIKit
protocol MapPresentationLogic {
func presentInitMapView(response: Map.Init.Response)
func presentSearchedRestaurants(response: Map.Search.Response)
func presentFetchedRestaurantInformation(response: Map.Fetch.Response)
}
class MapPresenter: MapPresentationLogic {
weak var viewController: MapDisplayLogic?
private let zoomLevel: Float = 16.0
<省略>
// MARK: Present fetched restaurant information
func presentFetchedRestaurantInformation(response: Map.Fetch.Response) {
let viewModel = Map.Fetch.ViewModel()
viewController?.transitRestaurantInformation(viewModel: viewModel)
}
}
|
presentFetchedRestaurantInformation
ViewController に画面遷移処理を依頼します
MapViewController.swift
ユーザからのアクションの受取口や、 Interactor への依頼処理、 Presenter からの指示を実行する処理などを変更しています。
1
2
3
4
5
6
7
8
9
10
11
12
13
14
15
16
17
18
19
20
21
22
23
24
25
26
27
28
29
30
31
32
33
34
35
36
37
38
39
40
41
42
43
44
45
46
47
48
49
50
| import UIKit
import GoogleMaps
protocol MapDisplayLogic: class {
func displayInitMap(viewModel: Map.Init.ViewModel)
func displaySearchedSuccess(viewModel: Map.Search.ViewModel)
func displaySearchedFailure(viewModel: Map.Search.ViewModel)
// 以下、追記
func transitRestaurantInformation(viewModel: Map.Fetch.ViewModel)
}
class MapViewController: UIViewController, MapDisplayLogic {
var interactor: MapBusinessLogic?
var router: (NSObjectProtocol & MapRoutingLogic & MapDataPassing)?
@IBOutlet weak var mapView: GMSMapView!
var locationManager: CLLocationManager?
<省略>
// 以下追記
// MARK: Browse restaurant information
func fetchRestaurantInformation(urlString: String) {
let request = Map.Fetch.Request(urlString: urlString)
interactor?.fetchRestaurantInformation(request: request)
}
func transitRestaurantInformation(viewModel: Map.Fetch.ViewModel) {
router?.routeToRestaurantInformation(segue: nil)
}
<省略>
}
<省略>
extension MapViewController: GMSMapViewDelegate {
<省略>
// 以下追記
func mapView(_ mapView: GMSMapView, didTapInfoWindowOf marker: GMSMarker) {
guard let cMarker = marker as? CustomGMSMarker else {
return
}
fetchRestaurantInformation(urlString: cMarker.restaurantURL)
}
}
|
func mapView(_ mapView: GMSMapView, didTapInfoWindowOf marker: GMSMarker)
- InfoWindowのタップ処理を
delegate でキャッチすることができるため、追記しています
- ここで、レストラン情報URLを
Interactor に受け渡すメソッドを実行します
fetchRestaurantInformation(urlString: String)
- レストラン情報URLを
Interactor に渡すメソッドです
transitRestaurantInformation
Presenter から指示を受けた後に、 Router に画面遷移を依頼しています
MapRouter.swift
今回、新たに画面遷移の処理を実装するため、 MapRouter.swift の処理を大幅に追加しています。
1
2
3
4
5
6
7
8
9
10
11
12
13
14
15
16
17
18
19
20
21
22
23
24
25
26
27
28
29
30
31
32
33
34
35
36
37
38
39
40
41
42
| import UIKit
@objc protocol MapRoutingLogic {
func routeToRestaurantInformation(segue: UIStoryboardSegue?)
}
protocol MapDataPassing {
var dataStore: MapDataStore? { get }
}
class MapRouter: NSObject, MapRoutingLogic, MapDataPassing {
weak var viewController: MapViewController?
var dataStore: MapDataStore?
// MARK: Routing
func routeToRestaurantInformation(segue: UIStoryboardSegue?) {
if let segue = segue {
let destinationVC = segue.destination as! RestaurantInformationViewController
var destinationDS = destinationVC.router!.dataStore!
passDataToRestaurantInformation(source: dataStore!, destination: &destinationDS)
} else {
let storyboard = UIStoryboard(name: "Main", bundle: nil)
let destinationVC = storyboard.instantiateViewController(withIdentifier: "RestaurantInformationViewController") as! RestaurantInformationViewController
var destinationDS = destinationVC.router!.dataStore!
passDataToRestaurantInformation(source: dataStore!, destination: &destinationDS)
navigateToRestaurantInformation(source: viewController!, destination: destinationVC)
}
}
// MARK: Navigation
func navigateToRestaurantInformation(source: MapViewController, destination: RestaurantInformationViewController) {
source.show(destination, sender: nil)
}
// MARK: Passing data
func passDataToRestaurantInformation(source: MapDataStore, destination: inout RestaurantInformationDataStore) {
destination.urlString = source.urlString
}
}
|
MapRoutingLogic
MapDataPassing
MapDataStore をフィールドとして定義していますMapInteractor 内で定義したプロトコルが MapDataStore であり、先程定義した urlString を含みます
routeToRestaurantInformation
- 内部処理は基本的に毎回同じのお決まりと考えて良いでしょう
navigateToRestaurantInformation
- 実際の画面遷移処理として
show メソッドを実行しています
passDataToRestaurantInformation
- 画面遷移元の
DataStore から、画面遷移先の DataStore に値を受け渡しています
まとめ
以上が今回の要件追加に合わせて実装し直した内容になります。
本記事で扱ったソースコードはCleanFoodLoggerにて公開しています。
今後は RealmSwift を用いた CRUD 処理だったり、 アプリでよく利用するUI面の話をできればと思います。
といったところで本日はここまで。