はじめに
さて、久しぶりにSpring Bootで遊んでみました。
と言ってもほとんどコードを書く必要のないFacebook認証についてです。
(本当はSpring Socialを利用したFacebookログインまで書こうかと思ったのですが、一旦簡単なところまで…)
Facebookアプリを新規作成
まずはFacebook認証などをするために、Facebook Developersサイトでアプリを登録しましょう。
1.facebook developersに遷移
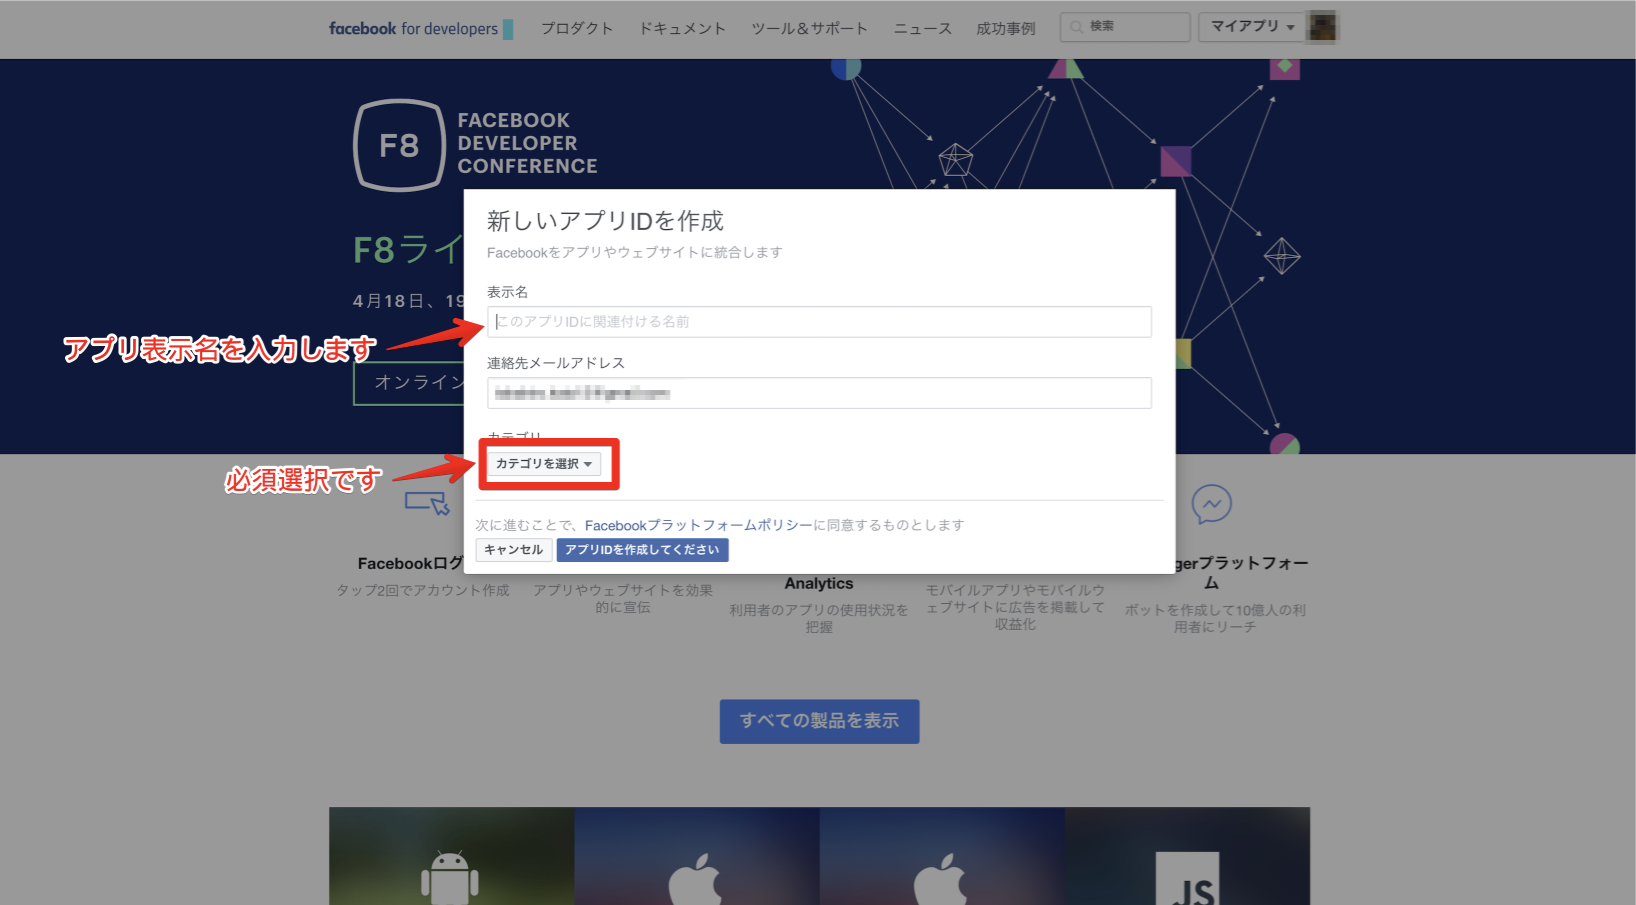
トップページから新規アプリを追加しましょう。

2.必要項目を入力
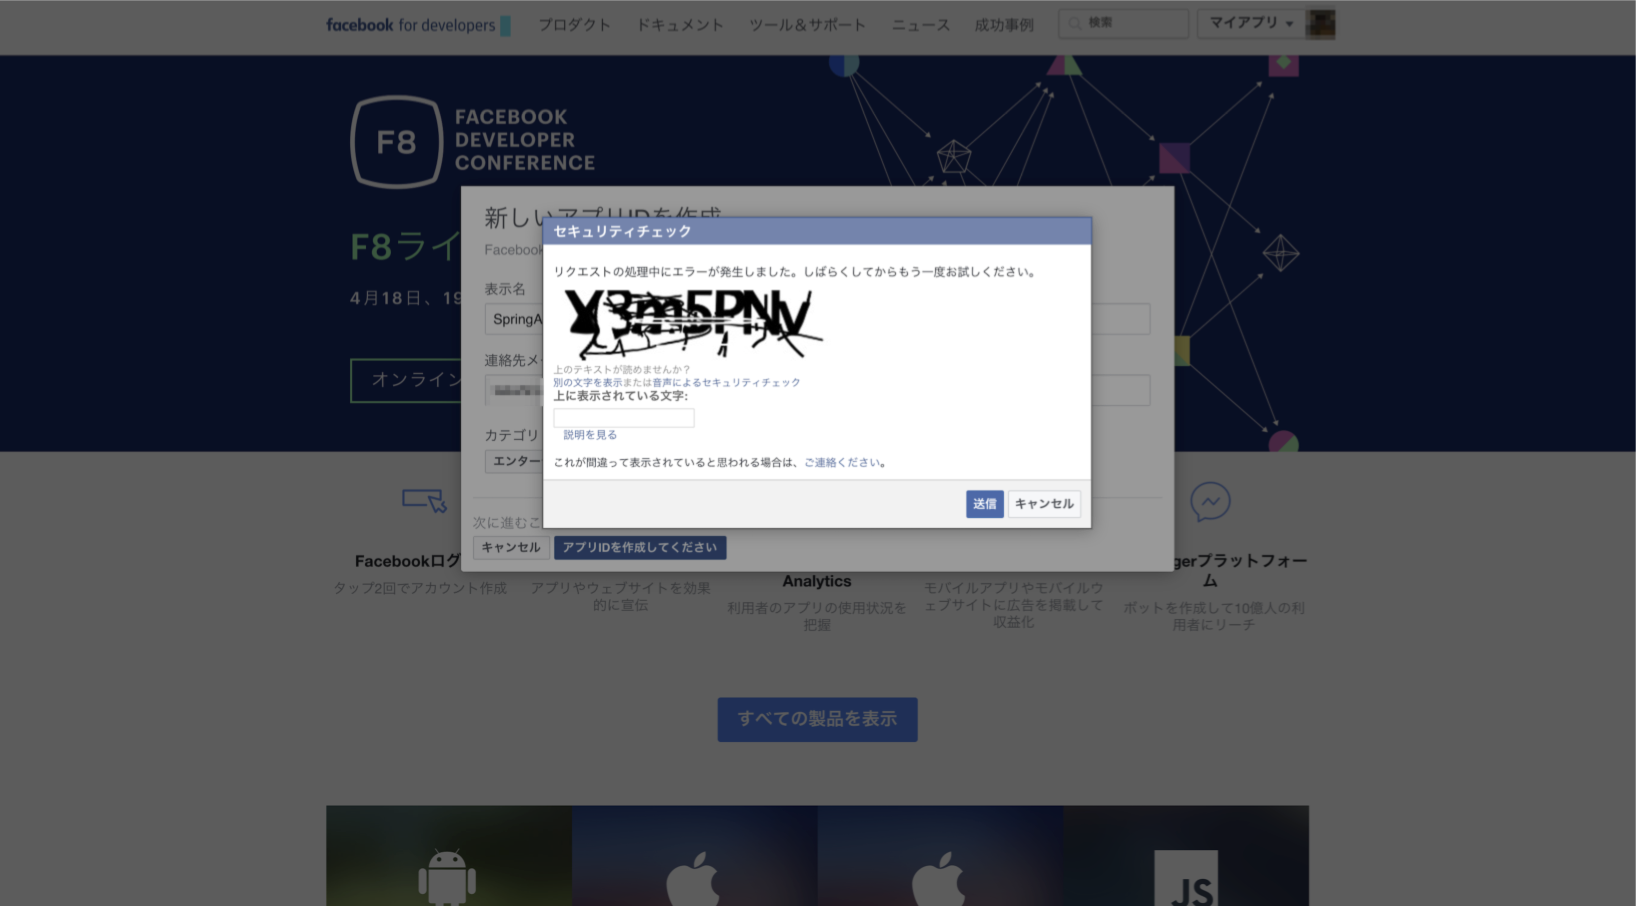
3.セキュリティチェックをパス
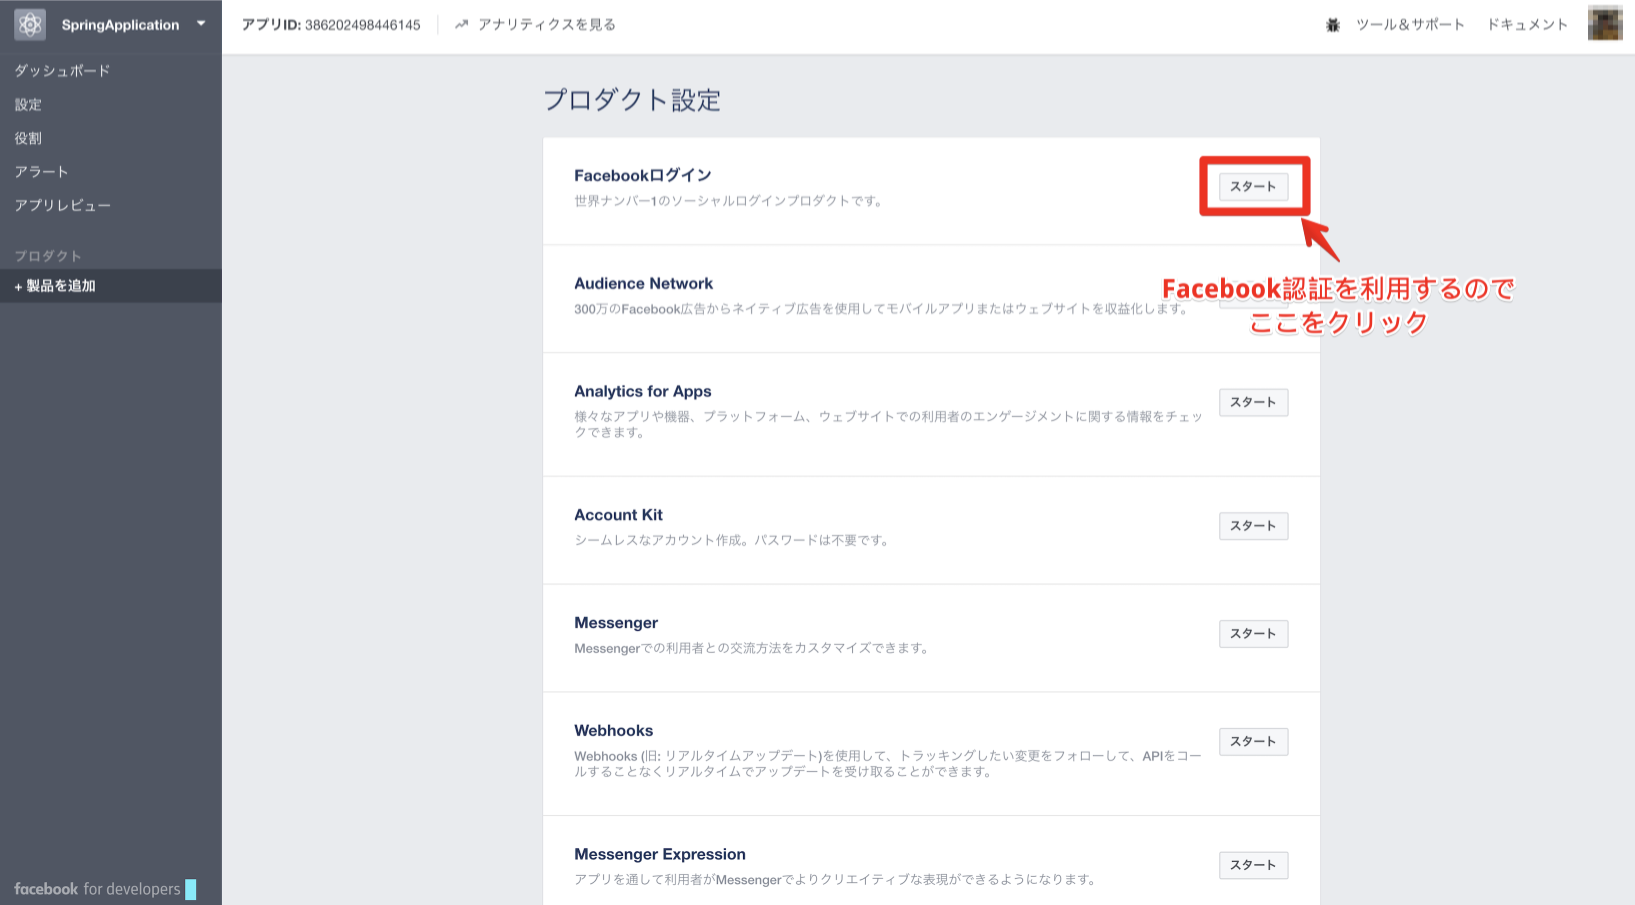
4.利用機能の選択
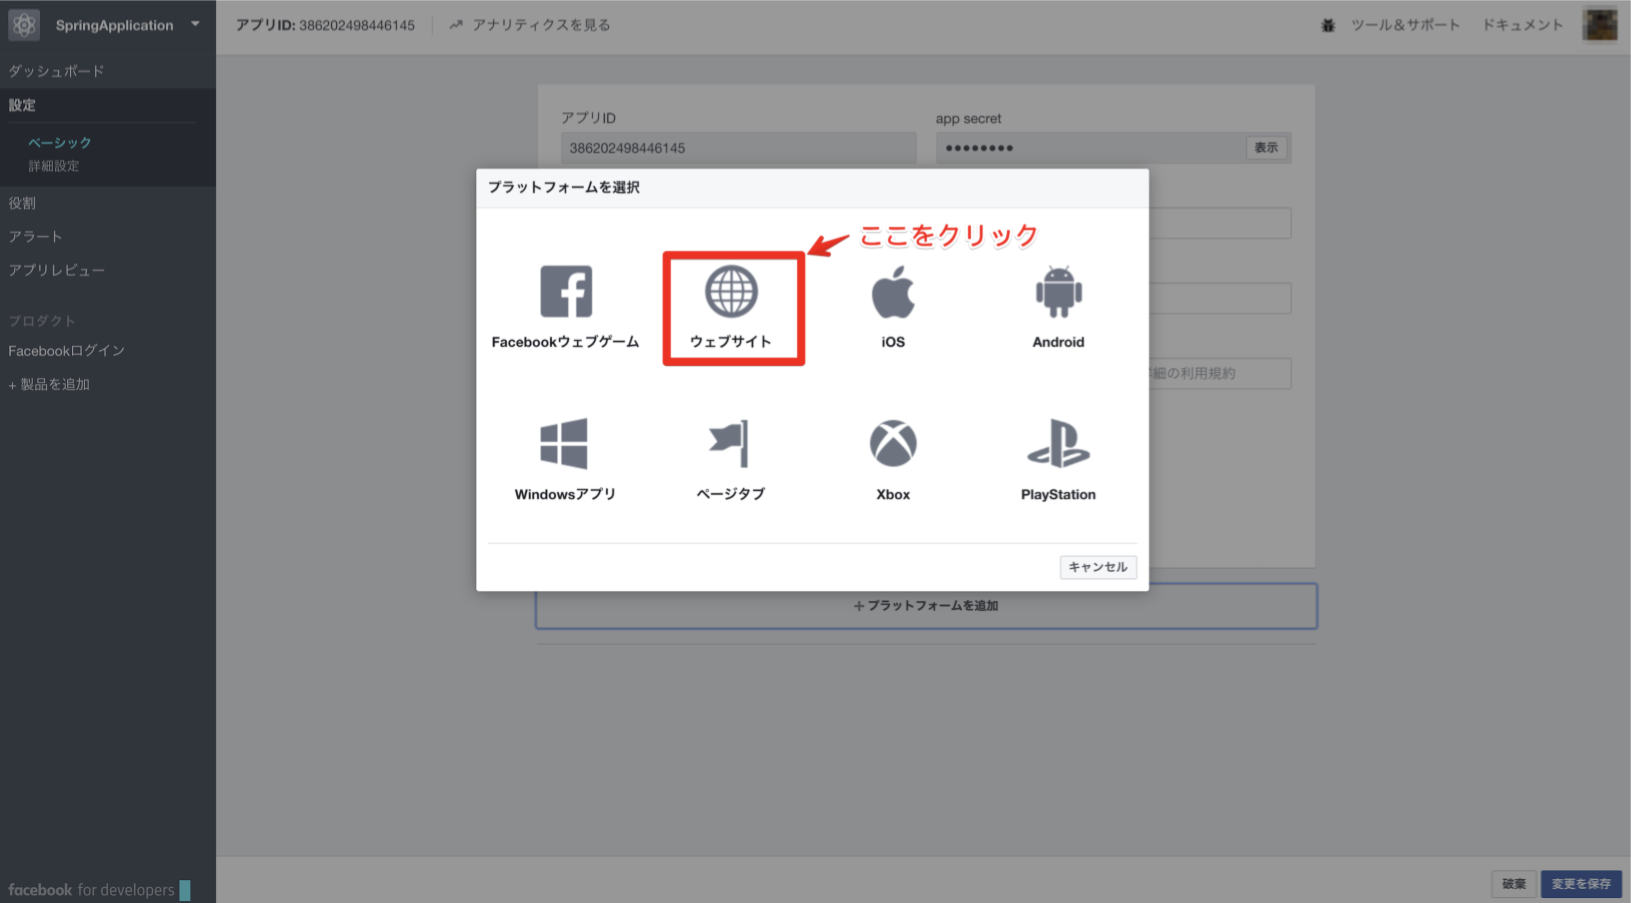
5.アプリの設定からプラットフォームを追加
左メニューから設定を選択して、下図の画面を出します。
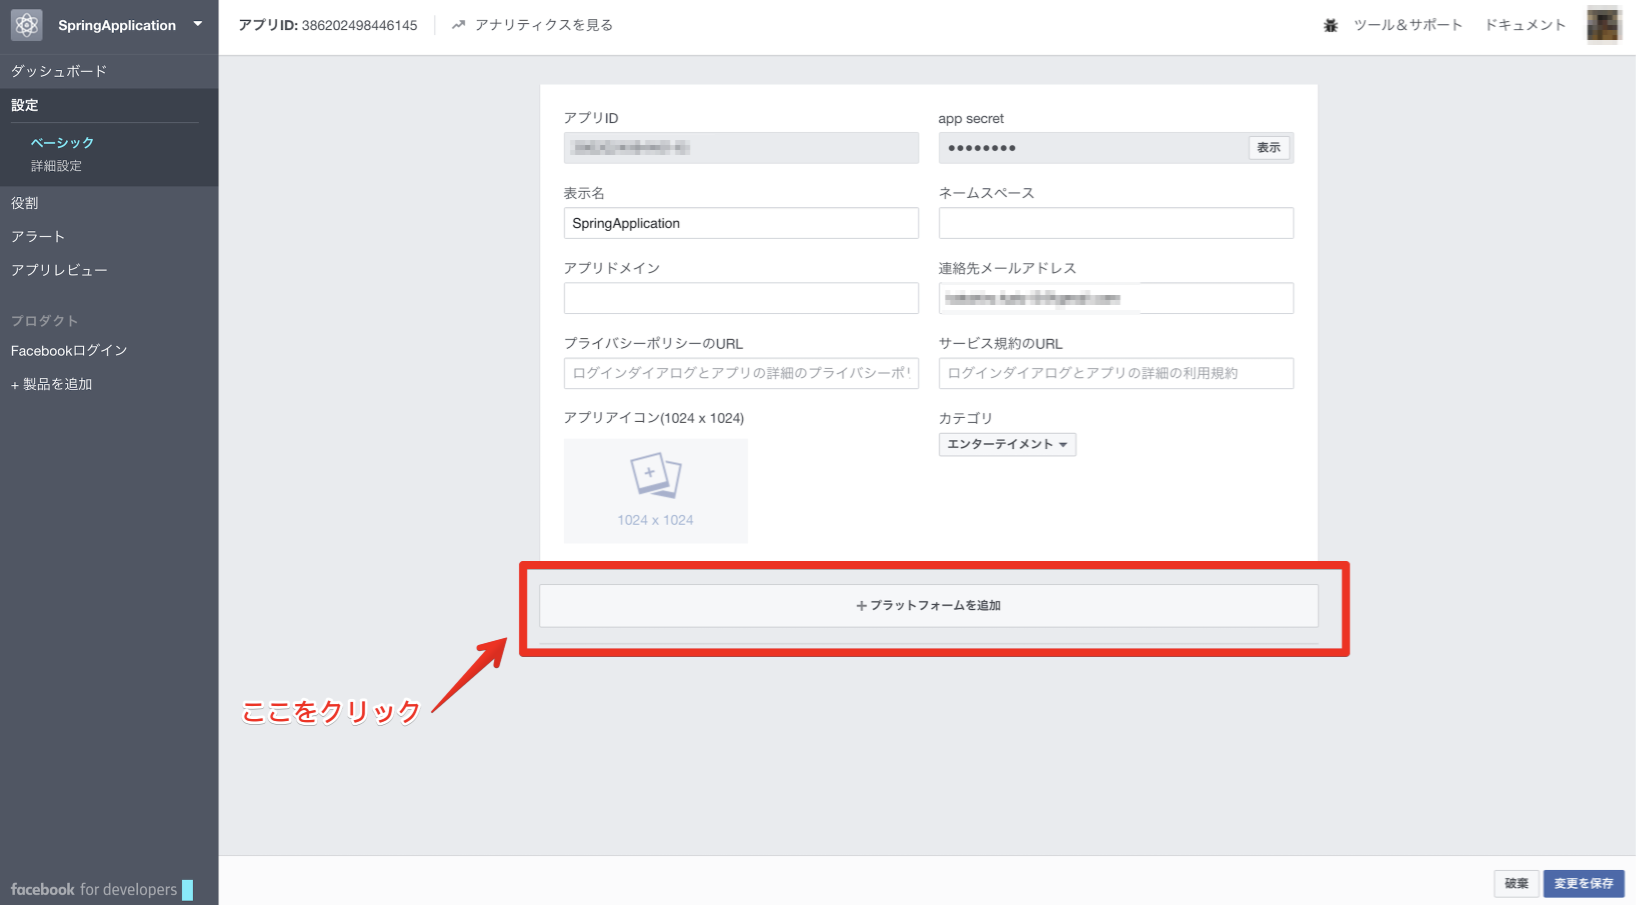
プラットフォームとして『ウェブサイト』を追加します。
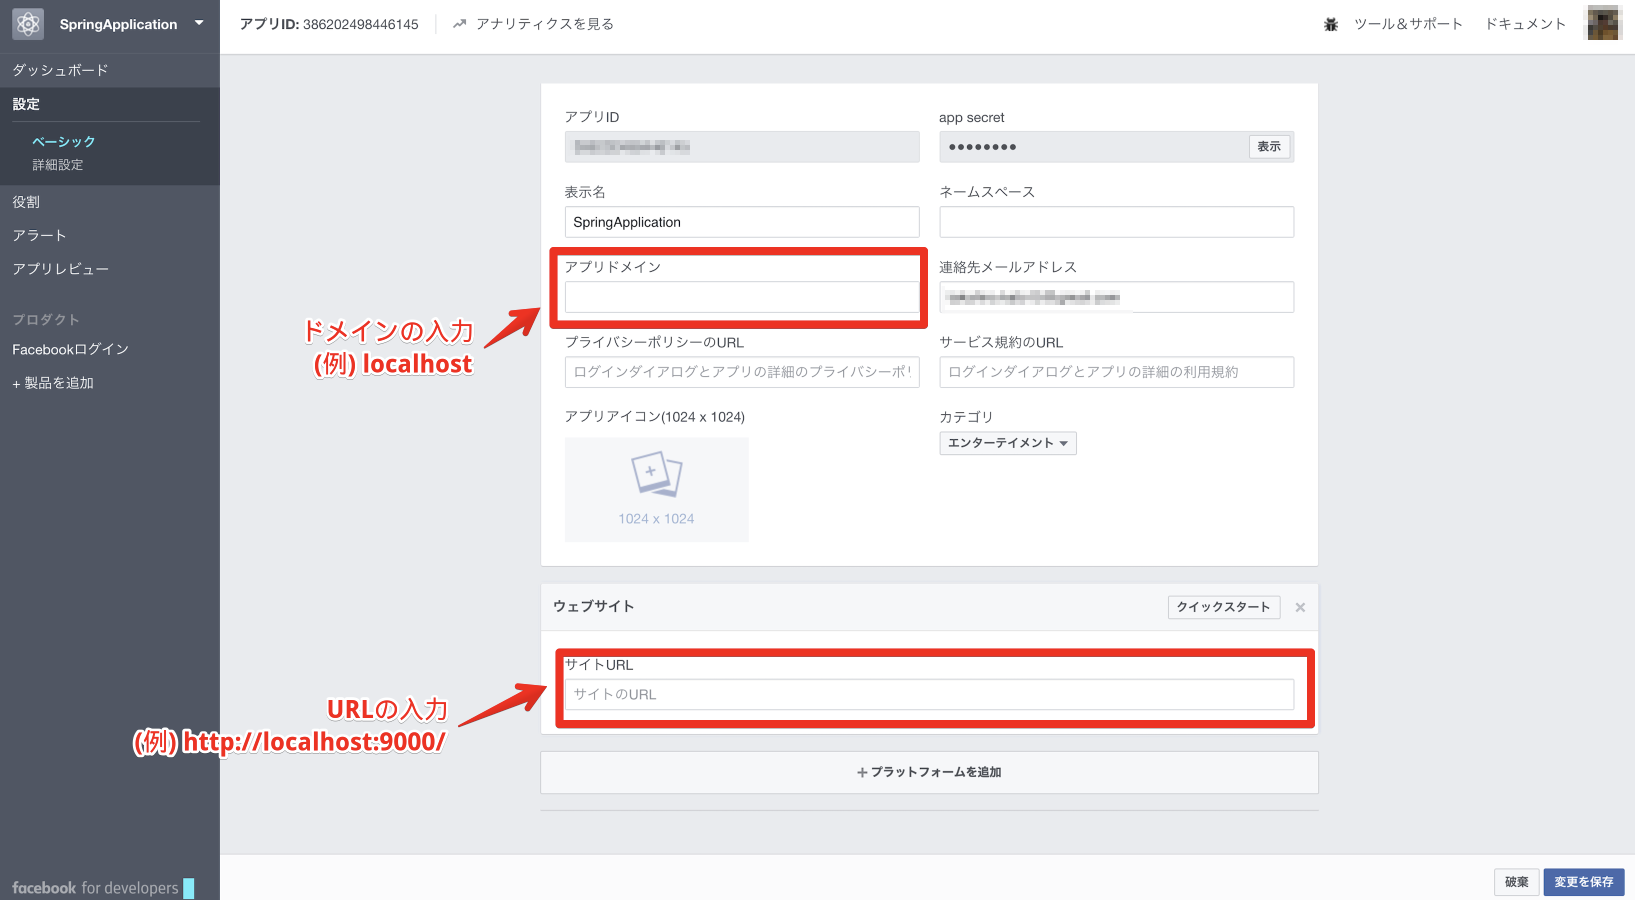
サイトURLやドメインなど必要事項を入力します。
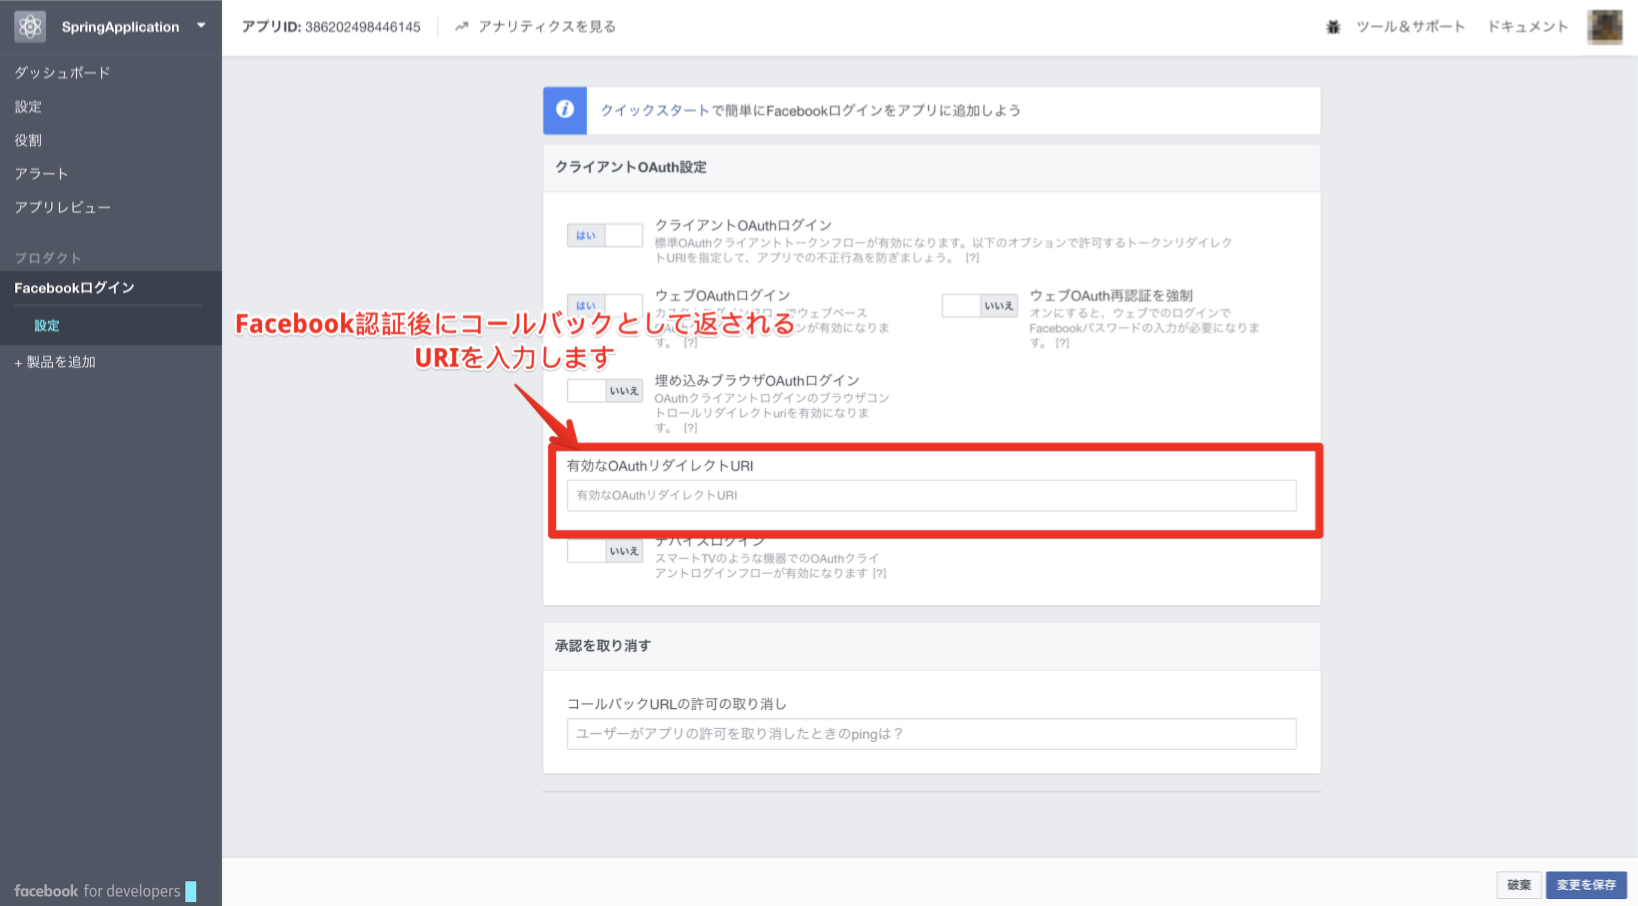
6.Facebookログインの設定
Facebook認証後に返されるリダイレクトURIを設定します。
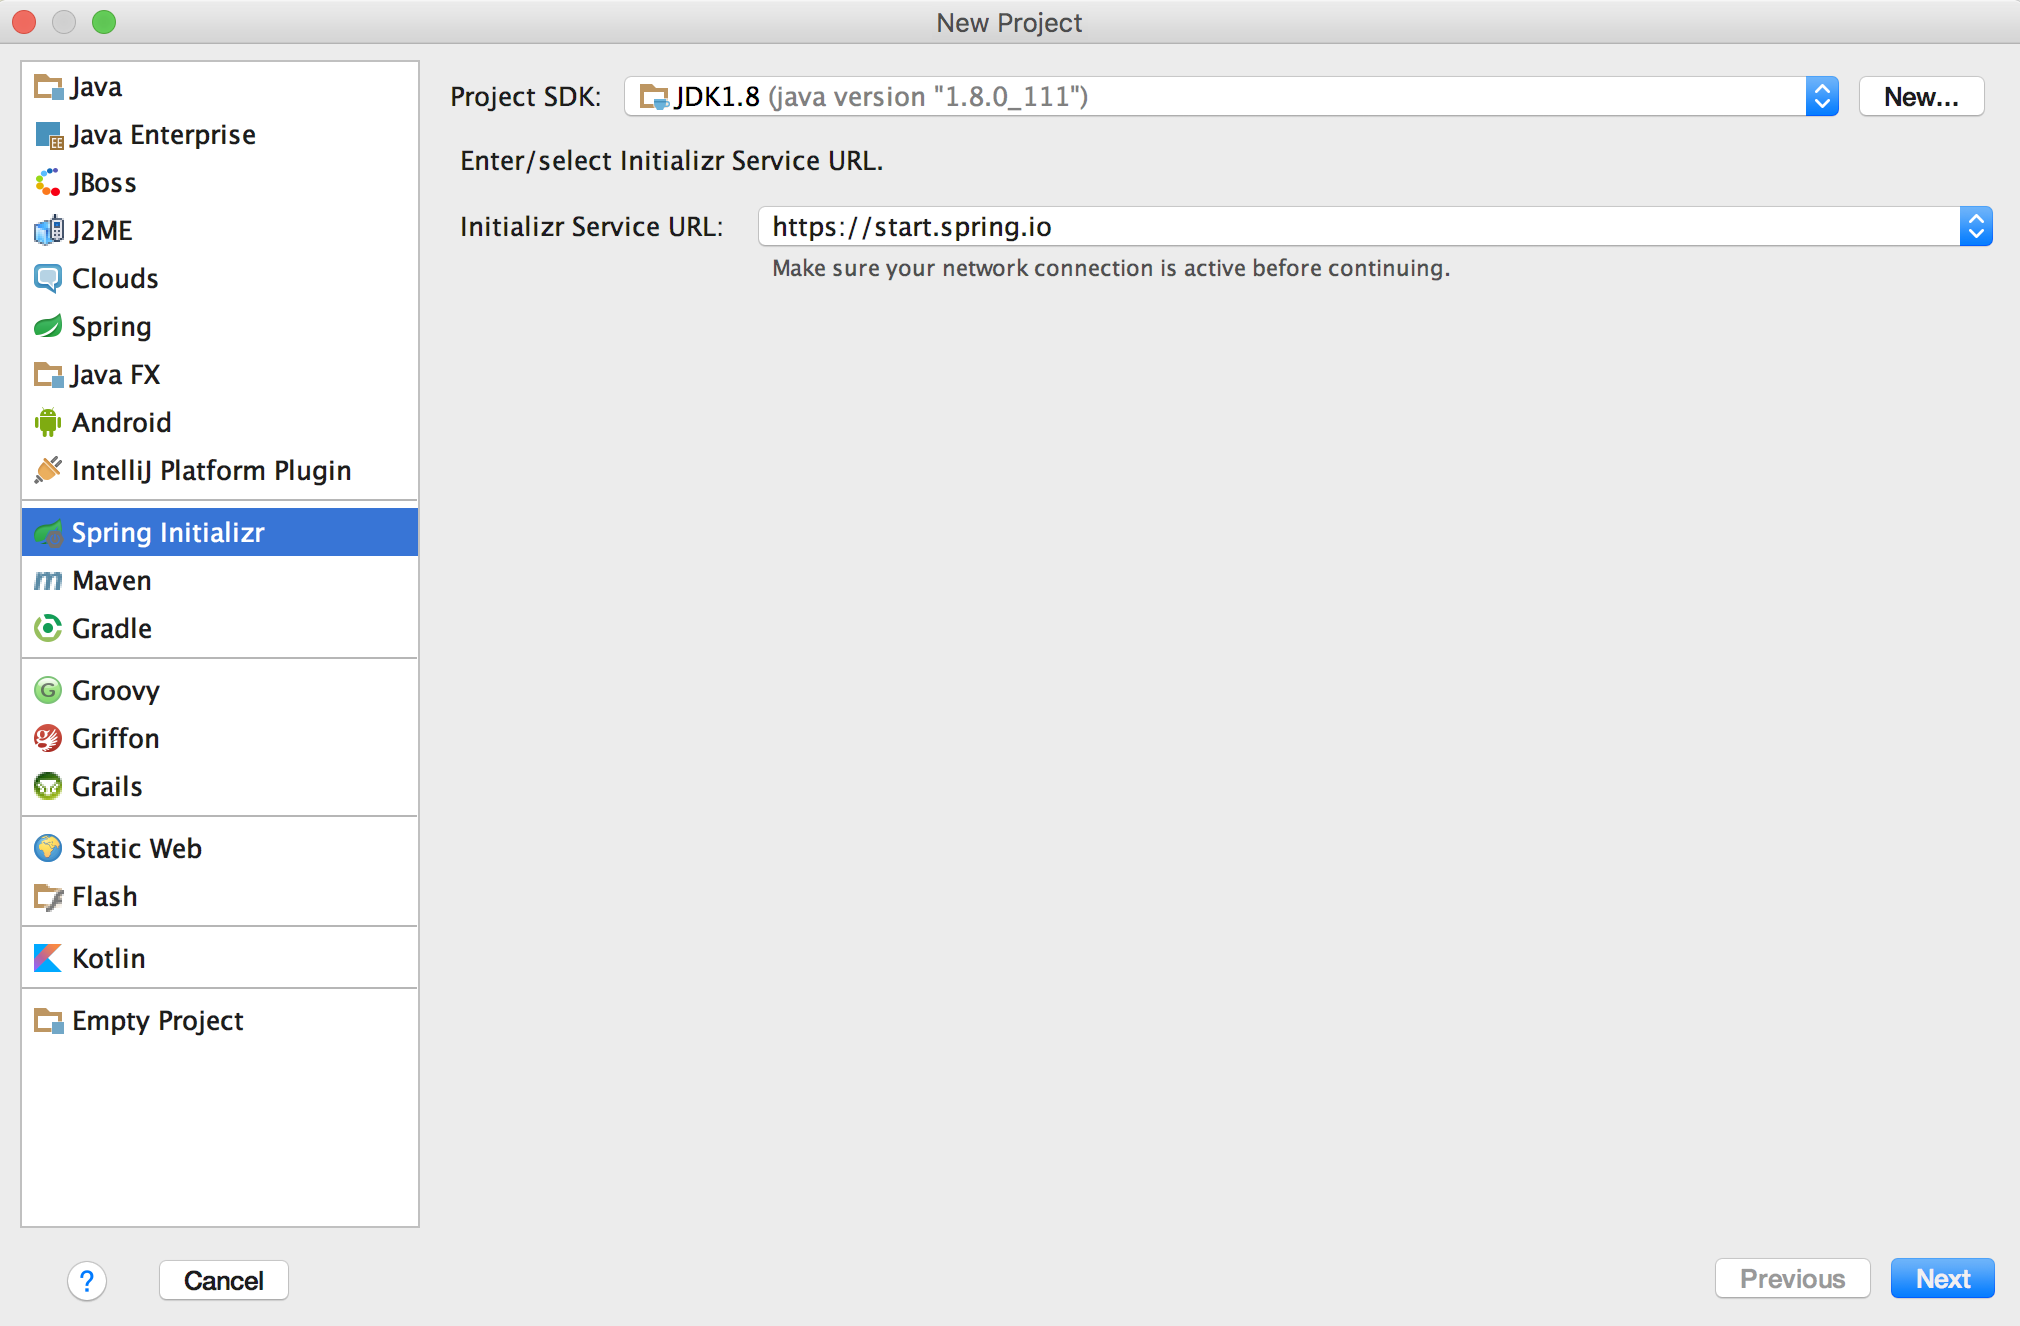
Spring Bootプロジェクトの新規作成
さて事前準備は完了したので、Spring BootプロジェクトをIntelliJで新規作成しましょう。
1.IntelliJを起動して、Spring Boot用にベースとなる形式を選択
2.ビルドツールとしてGradleを選択
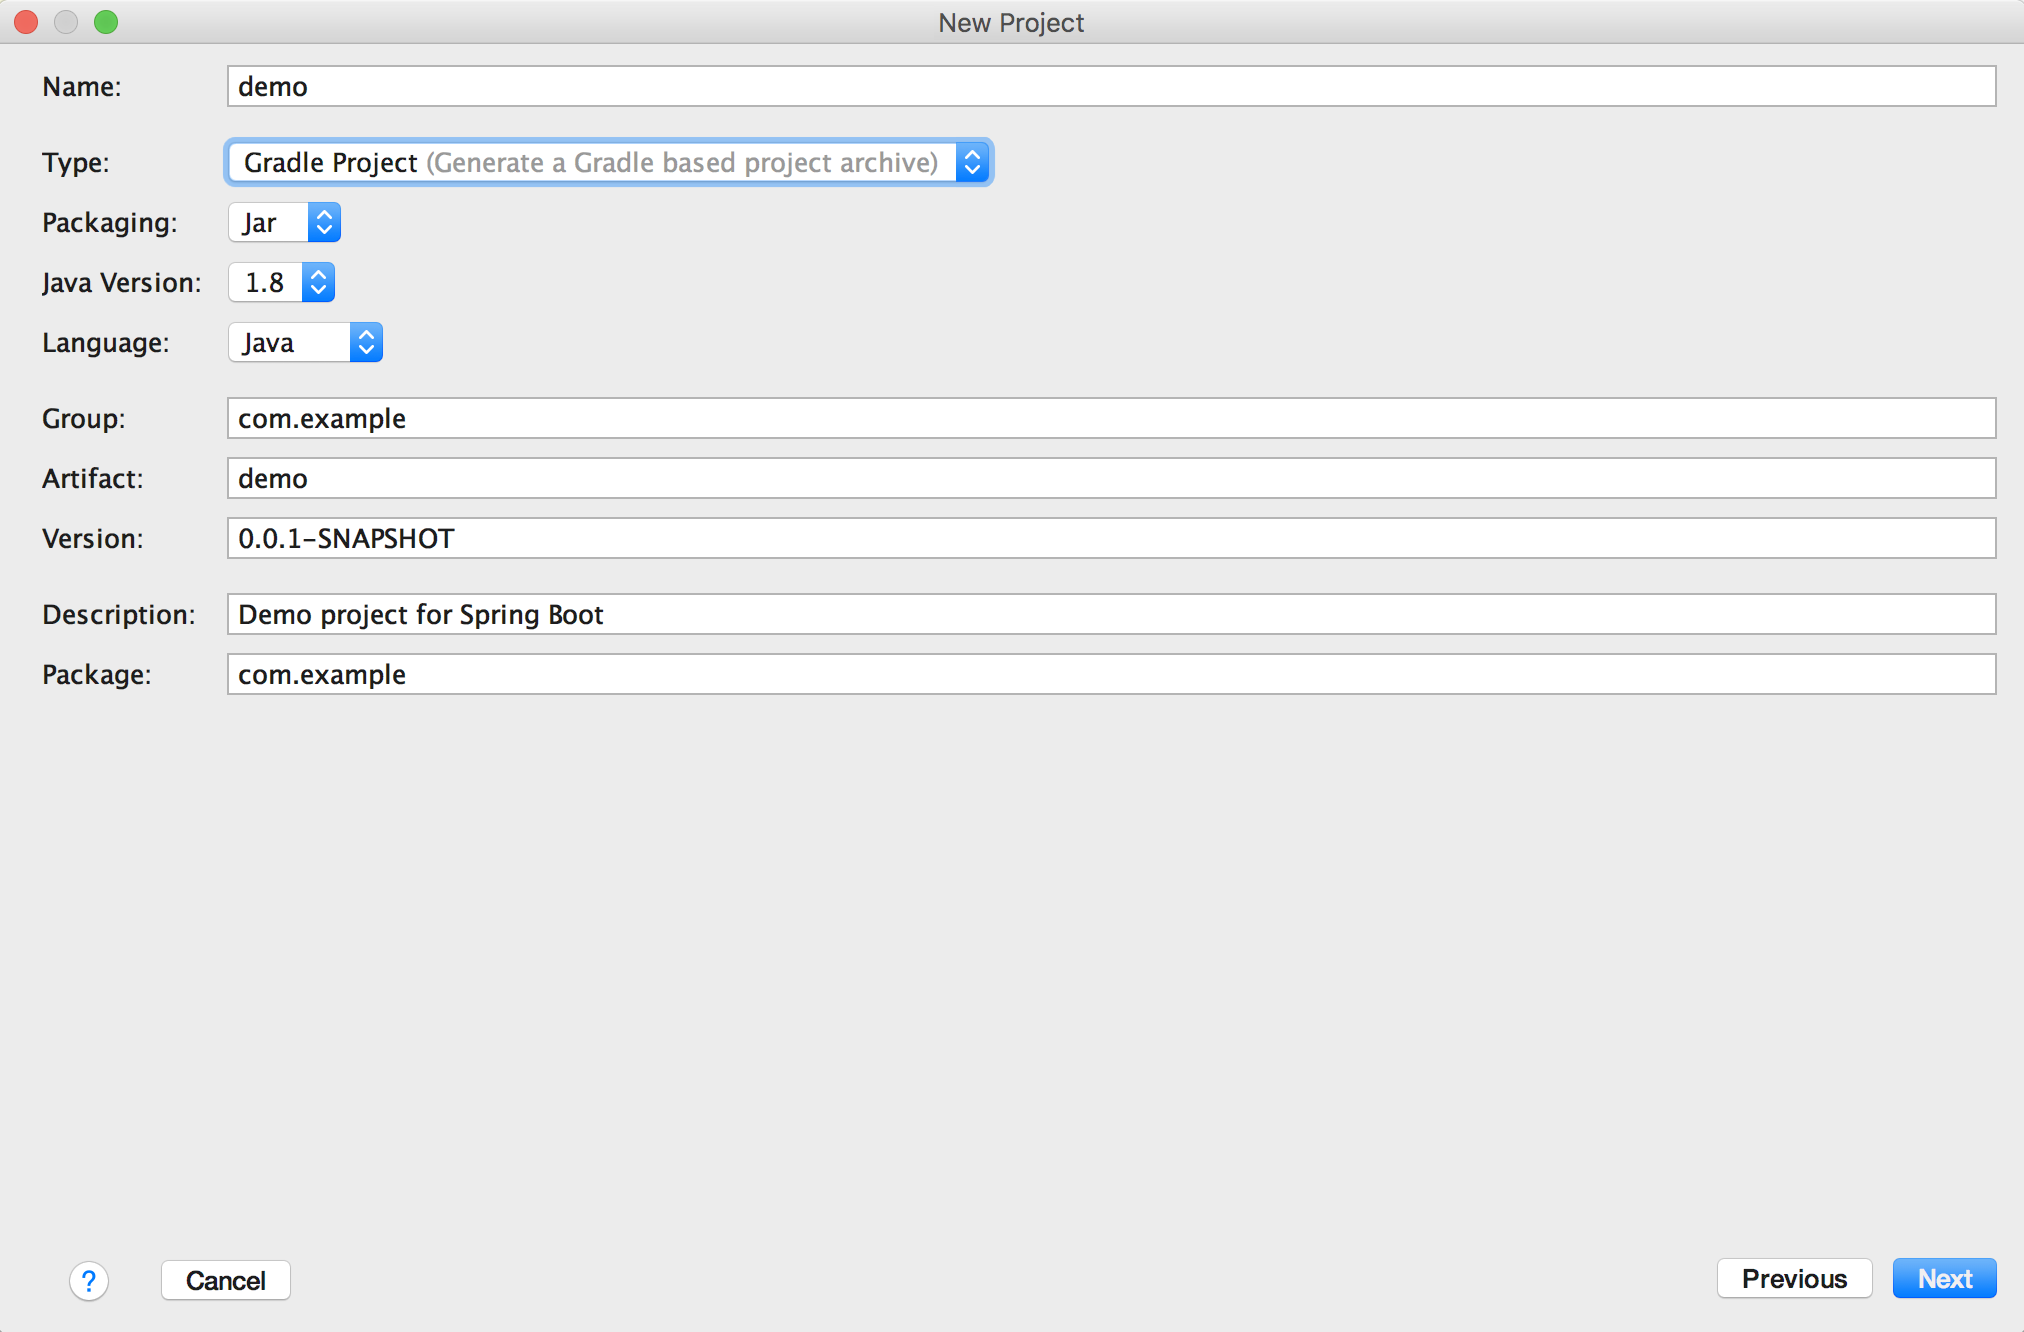
3.必要なモジュールを選択
今回は Security, Web, Thymeleafを利用します。

Facebook認証処理を実装
では、実装していきましょう。
Spring Security周りの修正
まず、Spring SecurityはデフォルトBasic認証が有効となっているため、一旦、認証不要箇所などを設定します。
1
2
3
4
5
6
7
8
9
10
11
12
13
14
15
16
17
18
19
20
21
| // SecurityConfig.java
package com.example.config;
import org.springframework.context.annotation.Configuration;
import org.springframework.security.config.annotation.web.builders.HttpSecurity;
import org.springframework.security.config.annotation.web.configuration.EnableWebSecurity;
import org.springframework.security.config.annotation.web.configuration.WebSecurityConfigurerAdapter;
@Configuration
@EnableWebSecurity
public class SecurityConfig extends WebSecurityConfigurerAdapter {
@Override
protected void configure(HttpSecurity http) throws Exception {
http
.authorizeRequests()
.antMatchers("/", "/complete", "/api/**").permitAll()
.anyRequest().authenticated();
http.formLogin();
}
}
|
上記ソースでは/と/completeと/api/**のアクセスを許可しています。
それぞれ、
/: トップぺージ/complete: Facebook認証後に表示する画面
ここで許可すると認証しなくても表示されてしまいますが、簡単のため/api/**: Facebook認証を実行するためのAPI用
という意図です。
HTMLページの表示
続いて、単体HTMLページ表示用の処理です。
Controllerの処理
Controllerは下記の通り。
1
2
3
4
5
6
7
8
9
10
11
12
13
14
15
16
17
18
19
20
21
22
23
24
25
| // TopController.java
package com.example.controller;
import org.springframework.web.bind.annotation.RequestMapping;
import org.springframework.web.bind.annotation.RestController;
import org.springframework.web.servlet.ModelAndView;
@RestController
@RequestMapping("/")
public class TopController {
// ログイン画面
@RequestMapping("")
public ModelAndView index(ModelAndView mav) {
mav.setViewName("index");
return mav;
}
// 認証完了後に表示する
@RequestMapping("/complete")
public ModelAndView complete(ModelAndView mav) {
mav.setViewName("complete");
return mav;
}
}
|
HTMLの処理
そして、HTMLファイルは下記の通り。
1
2
3
4
5
6
7
8
9
10
11
12
13
14
15
16
17
| <!-- index.html -->
<!DOCTYPE html>
<html lang="en" xmlns="http://www.thymeleaf.org">
<head>
<meta
http-equiv="Content-Type"
content="text/html"
charset="UTF-8"/>
<title>Facebook Login Sample</title>
</head>
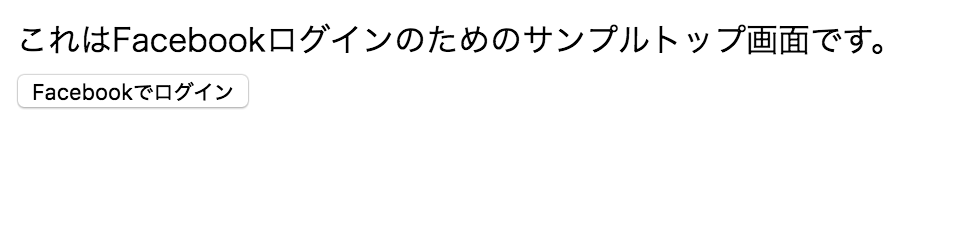
<body>
<div>これはFacebookログインのためのサンプルトップ画面です。</div>
<form action="/api/login" method="get">
<input type="submit" value="Facebookでログイン"/>
</form>
</body>
</html>
|
1
2
3
4
5
6
7
8
9
10
11
12
13
14
| <!-- complete.html -->
<!DOCTYPE html>
<html lang="en" xmlns="http://www.thymeleaf.org">
<head>
<meta
http-equiv="Content-Type"
content="text/html"
charset="UTF-8"/>
<title>ログイン完了画面</title>
</head>
<body>
<div>ログイン完了しました!!</div>
</body>
</html>
|
環境変数の設定
FacebookのアプリIDや認証リクエストを送るURLなどの環境変数を書き出します。
1
2
3
4
5
| // application.properties
server.port=9000
spring.social.facebook.appId=xxxxxxxxx
sampleApp.urls.facebookLogin=https://www.facebook.com/v2.8/dialog/oauth?client_id=xxxxxxxxx&scope=public_profile,email
sampleApp.urls.oAuthCallback=http://localhost:9000/api/callback
|
ここで書いた環境変数を他のJavaファイルで利用したいので、
新たにMyBean.javaとMyProperties.javaを新規作成します。
1
2
3
4
5
6
7
8
9
10
11
12
13
14
15
16
17
| // MyBean.java
package com.example.config.bean;
public class MyBean {
public String facebookLogin;
public String oAuthCallback;
public void setFacebookLogin(String facebookLogin) {
this.facebookLogin = facebookLogin;
}
public void setoAuthCallback(String oAuthCallback) {
this.oAuthCallback = oAuthCallback;
}
}
|
1
2
3
4
5
6
7
8
9
10
11
12
13
14
15
16
17
18
19
20
21
22
23
24
25
| // MyProperties
package com.example.config.properties;
import com.example.config.bean.MyBean;
import org.springframework.beans.factory.annotation.Autowired;
import org.springframework.context.annotation.Bean;
import org.springframework.context.annotation.Configuration;
import org.springframework.context.annotation.PropertySource;
import org.springframework.core.env.Environment;
@Configuration
@PropertySource(value = {"classpath:application.properties"})
public class MyProperties {
@Autowired
private Environment env;
@Bean
public MyBean myBean() {
MyBean myBean = new MyBean();
myBean.setFacebookLogin(env.getProperty("sampleApp.urls.facebookLogin"));
myBean.setoAuthCallback(env.getProperty("sampleApp.urls.oAuthCallback"));
return myBean;
}
}
|
Facebook認証周りの処理
後はFacebook認証先にURLを送るだけです。
1
2
3
4
5
6
7
8
9
10
11
12
13
14
15
16
17
18
19
20
21
22
23
24
25
26
27
28
29
30
31
| package com.example.controller;
import com.example.config.bean.MyBean;
import org.springframework.beans.factory.annotation.Autowired;
import org.springframework.stereotype.Controller;
import org.springframework.web.bind.annotation.RequestMapping;
@Controller
@RequestMapping("/api")
public class FacebookLoginController {
private static final String REDIRECT_URI_PARAMETER = "redirect_uri";
@Autowired
private MyBean myBean;
@RequestMapping("/login")
public String facebookLogin() {
StringBuilder sb = new StringBuilder();
sb.append(myBean.facebookLogin);
sb.append("&").append(REDIRECT_URI_PARAMETER).append("=");
sb.append(myBean.oAuthCallback);
return "redirect:" + sb.toString();
}
@RequestMapping("/callback")
public String callback() {
return "redirect:/complete";
}
}
|
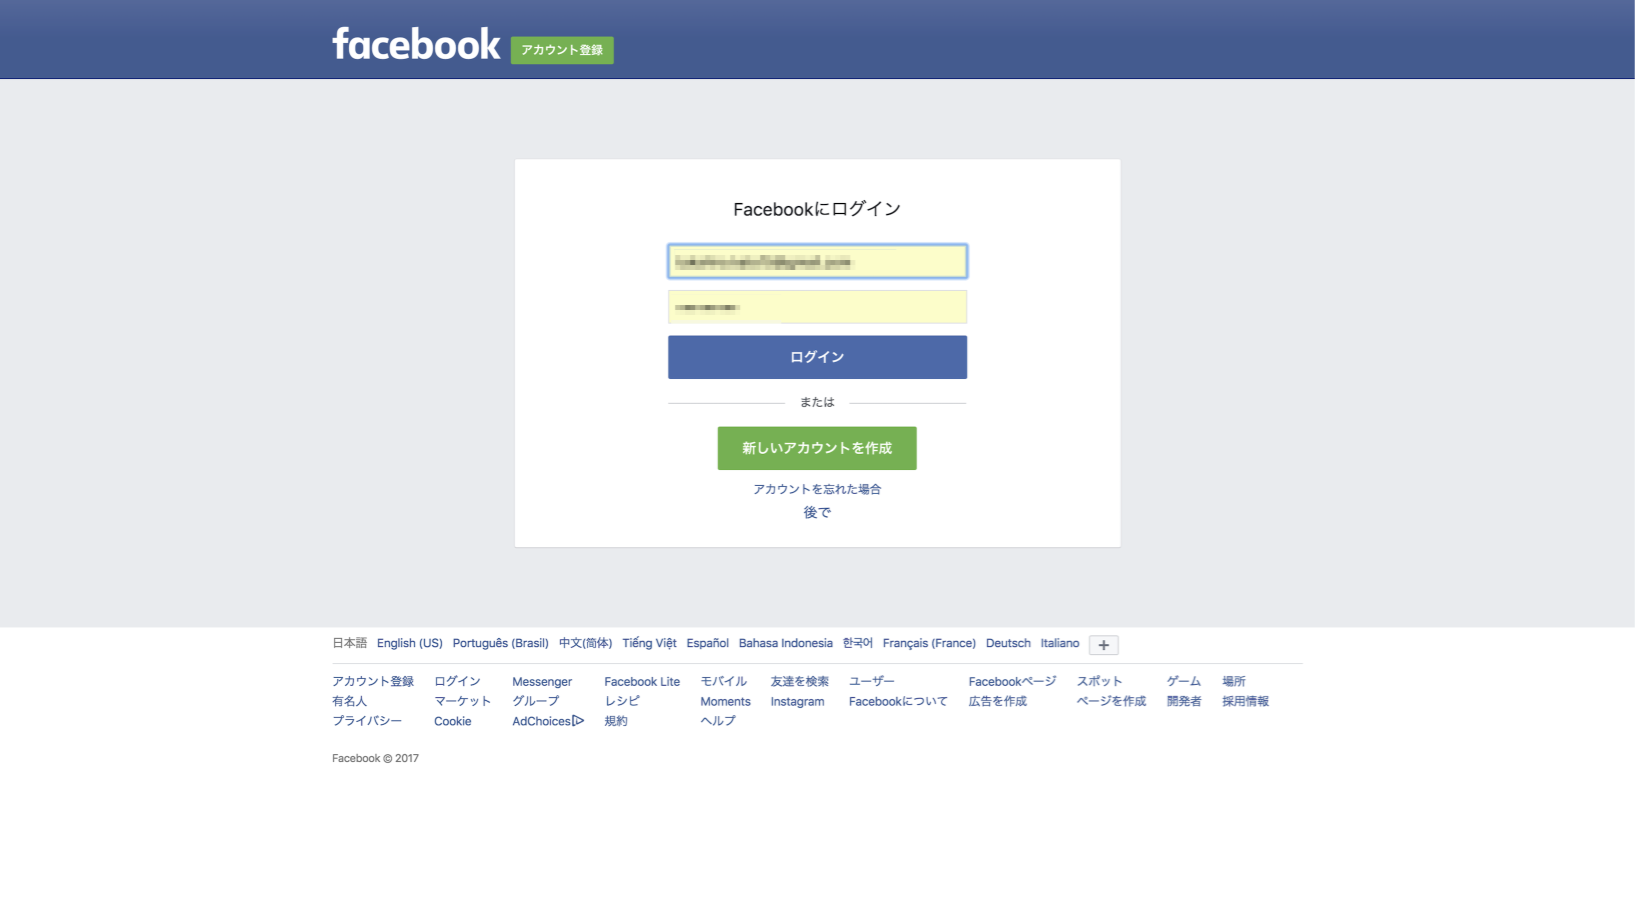
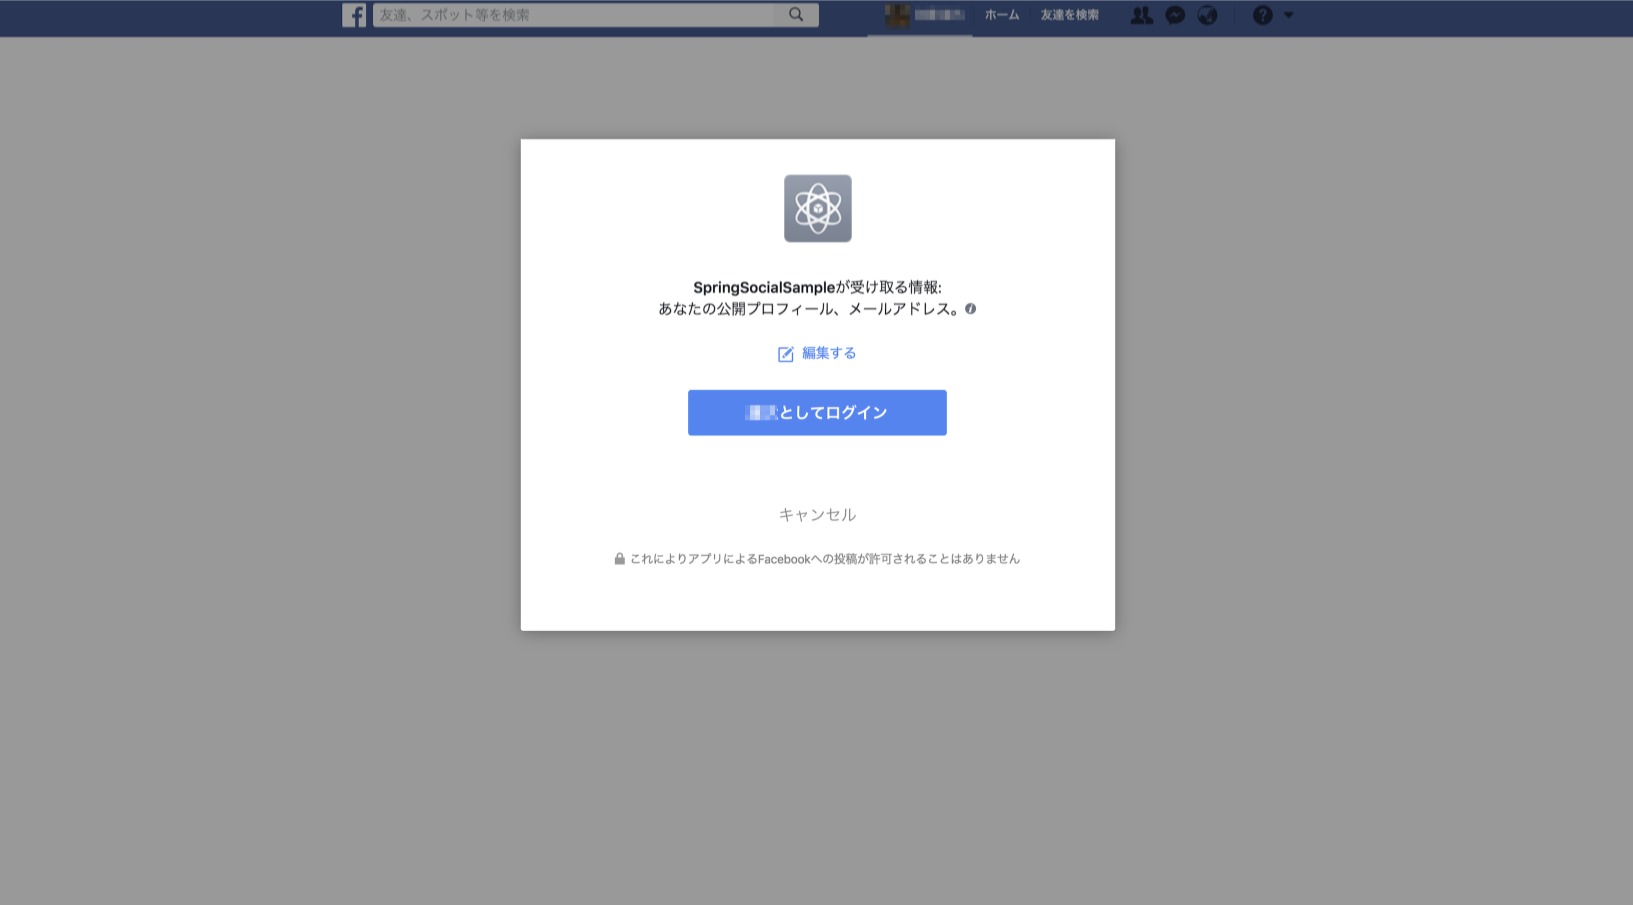
動作確認
ここまで実装ができたので動作確認をしてみましょう。

まとめ
今回は本当に簡易的な部分しか書けませんでした
本当はSpring Socialを使いこなして、もっといろいろと書こうかと思ったのですが、また次の機会ということで…