TableLayoutとは
TabLayoutに続いて、本日は、TableLayoutを使った画面作成をしたいと思います。
AndroidでのTableLayoutはHTMLで言うところの<table>タグに当たり、
iOSで言うところのUITableViewが使いどころとしては近いと思います。
筆者が思うにTableLayoutは決まったレイアウトの実装には向いていますが、
複雑かつオリジナリティの高い画面を作成する際に使うには難しいのかなと感じています。
何はともあれ、実装に入っていきましょう。
本記事で利用しているAndroid Studioは Android Studio 2.0 Beta 3 になります。
(Android Studio 1.5 以上であれば基本的に同じだと思います。)
TableLayoutを使ってみよう!
順を追って説明していきます。
目標として、下図のような画面作成を目指したいと思います。
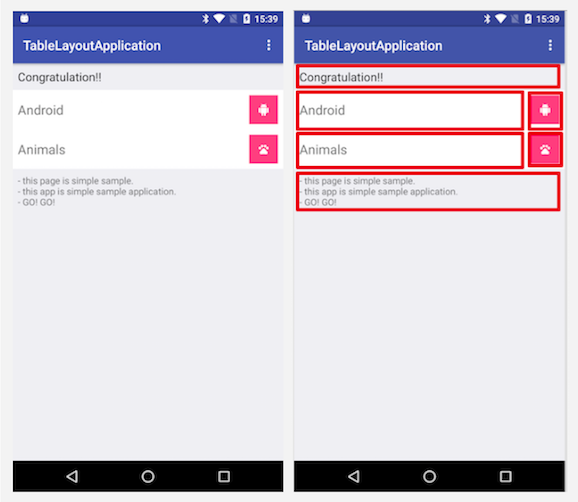
これは1行目と4行目は1つのカラムで、2行目と3行目は2つのカラムで構成しています。
1. Android StudioでBlank Activityを選択して、プロジェクトを新規作成
下記のようなプロジェクト構成ができあがります。
1
2
3
4
5
6
7
8
9
10
11
12
13
14
15
16
17
18
| app
┣━━ manifests
┃ ┗━━ AndroidManifest.xml
┣━━ java
┃ ┣━━ com.example.takahiro.tablelayoutapplication
┃ ┃ ┗━━ MainActivity
┃ ┣━━ com.example.takahiro.tablelayoutapplication(androidTest)
┃ ┃ ┗━━ ApplicationTest
┃ ┗━━ com.example.takahiro.tablelayoutapplication(test)
┃ ┗━━ ExampleUnitTest
┗━━ res
┣━━ drawable
┣━━ layout
┃ ┣━━ activity_main.xml
┃ ┗━━ content_main.xml
┣━━ menu
┣━━ mipmap
┗━━ values
|
2.content_main.xmlにTableLayoutを追加
続いて、TableLayoutをレイアウトファイルに実装していきましょう。
1
2
3
4
5
6
7
8
9
10
11
12
13
14
15
16
17
18
19
20
21
22
23
24
25
26
27
28
29
30
31
32
33
34
35
36
37
38
39
40
41
42
43
44
45
46
47
48
49
50
51
52
53
54
55
56
57
58
59
60
61
62
63
64
65
66
67
68
69
70
71
72
73
74
75
76
77
78
79
80
81
82
83
84
85
86
87
88
89
90
91
92
93
94
95
96
97
98
99
100
101
102
103
104
105
106
107
108
109
110
111
112
113
114
115
116
117
118
119
120
121
| // content_main.xml
<?xml version="1.0" encoding="utf-8"?>
<LinearLayout xmlns:android="http://schemas.android.com/apk/res/android"
xmlns:app="http://schemas.android.com/apk/res-auto"
xmlns:tools="http://schemas.android.com/tools"
android:layout_width="match_parent"
android:layout_height="match_parent"
android:paddingBottom="0dp"
android:paddingLeft="0dp"
android:paddingRight="0dp"
android:paddingTop="0dp"
android:background="#efeff4"
app:layout_behavior="@string/appbar_scrolling_view_behavior"
tools:context="com.example.ec_dev.tablelayoutapplication.MainActivity"
tools:showIn="@layout/activity_main">
<!-- 構成要素が多くなる場合を踏まえて、画面スクロールを可能にしておく -->
<ScrollView
android:layout_width="match_parent"
android:layout_height="wrap_content"
android:id="@+id/scrollView">
<TableLayout
android:layout_width="match_parent"
android:layout_height="wrap_content"
android:stretchColumns="0">
<!-- 1行目 -->
<TableRow
android:layout_width="match_parent"
android:layout_height="match_parent"
android:paddingBottom="8dp"
android:paddingTop="8dp">
<TextView
android:layout_width="wrap_content"
android:layout_height="wrap_content"
android:textAppearance="?android:attr/textAppearanceLarge"
android:text="@string/top_message"
android:layout_span="2"
android:id="@+id/textView"
android:textSize="18sp"
android:paddingRight="8dp"
android:paddingLeft="8dp"/>
</TableRow>
<!-- 2行目 -->
<TableRow
android:layout_width="match_parent"
android:layout_height="match_parent"
android:background="#ffffff"
android:paddingBottom="8dp"
android:paddingTop="8dp">
<TextView
android:layout_width="wrap_content"
android:layout_height="44dp"
android:text="@string/androidText"
android:id="@+id/textView2"
android:textSize="20sp"
android:gravity="center_vertical"
android:paddingRight="8dp"
android:paddingLeft="@dimen/8dp"/>
<ImageButton
android:layout_width="44dp"
android:layout_height="44dp"
android:id="@+id/imageButton"
android:src="@drawable/ic_android_white_18dp"
android:background="@color/colorAccent"
android:layout_marginRight="8dp"/>
</TableRow>
<-- 3行目 -->
<TableRow
android:layout_width="match_parent"
android:layout_height="match_parent"
android:background="#ffffff"
android:paddingBottom="8dp"
android:paddingTop="8dp">
<TextView
android:layout_width="wrap_content"
android:layout_height="44dp"
android:text="@string/animalText"
android:id="@+id/textView2"
android:textSize="20sp"
android:gravity="center_vertical"
android:paddingRight="8dp"
android:paddingLeft="8dp"/>
<ImageButton
android:layout_width="44dp"
android:layout_height="44dp"
android:id="@+id/imageButton"
android:src="@drawable/ic_pets_white_18dp"
android:background="@color/colorAccent"
android:layout_marginRight="8dp"/>
</TableRow>
<!-- 4行目 -->
<TableRow
android:layout_width="match_parent"
android:layout_height="match_parent"
android:paddingBottom="8dp"
android:paddingTop="8dp">
<TextView
android:layout_width="wrap_content"
android:layout_height="wrap_content"
android:textAppearance="?android:attr/textAppearanceLarge"
android:text="@string/last_message"
android:layout_span="2"
android:id="@+id/textView"
android:textSize="18sp"
android:paddingRight="8dp"
android:paddingLeft="8dp"/>
</TableRow>
</TableLayout>
</ScrollView>
</LinearLayout>
|
ポイントは下記です。
TableLayoutにandroid:stretchColumns="0"を設定して、0番目のカラム幅を極力大きくする- 1行目と4行目
TableRowのTextViewはandroid:layout_span="2"を設定して、カラム2つ分とする
その他、必要なケースに合わせてデザインを整えましょう。
因みに、activity_main.xmlは以下にしています。
1
2
3
4
5
6
7
8
9
10
11
12
13
14
15
16
17
18
19
20
21
22
23
24
25
| <?xml version="1.0" encoding="utf-8"?>
<android.support.design.widget.CoordinatorLayout xmlns:android="http://schemas.android.com/apk/res/android"
xmlns:app="http://schemas.android.com/apk/res-auto"
xmlns:tools="http://schemas.android.com/tools"
android:layout_width="match_parent"
android:layout_height="match_parent"
android:fitsSystemWindows="true"
tools:context="com.example.takahiro.tablelayoutapplication.MainActivity">
<android.support.design.widget.AppBarLayout
android:layout_width="match_parent"
android:layout_height="wrap_content"
android:theme="@style/AppTheme.AppBarOverlay">
<android.support.v7.widget.Toolbar
android:id="@+id/toolbar"
android:layout_width="match_parent"
android:layout_height="?attr/actionBarSize"
android:background="?attr/colorPrimary"
app:popupTheme="@style/AppTheme.PopupOverlay" />
</android.support.design.widget.AppBarLayout>
<include layout="@layout/content_main" />
</android.support.design.widget.CoordinatorLayout>
|
デフォルトではFloatingActionButtonが作成されますが、不要なので削除しています。
合わせて、strings.xmlも編集しています。
1
2
3
4
5
6
7
8
9
10
| <resources>
<string name="app_name">TableLayoutApplication</string>
<string name="action_settings">Settings</string>
<string name="top_message">Congratulation!!</string>
<string name="androidText">Android</string>
<string name="animalText">Animals</string>
<string name="last_message">
- this page is simple sample.\n- this app is simple sample application.\n- GO! GO!
</string>
</resources>
|
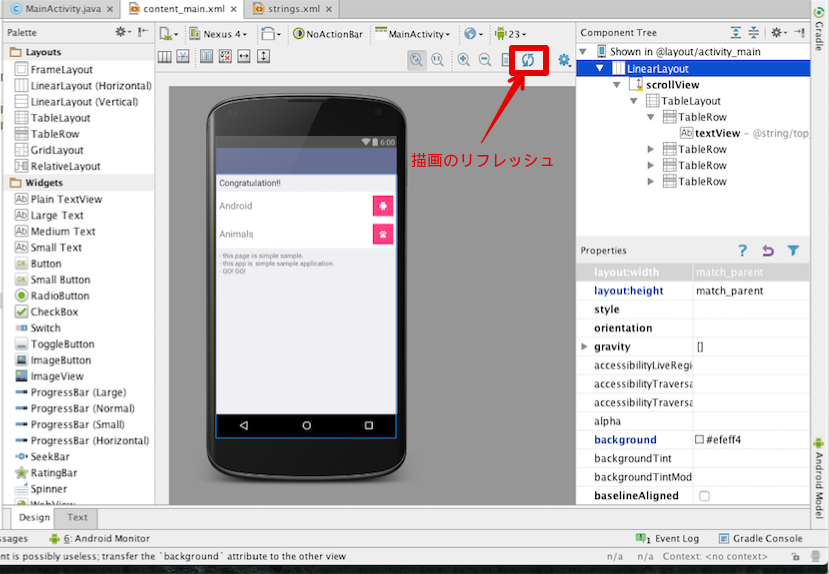
レイアウトを作成している途中、レイアウトが想定していない形になったり、崩れてしまったりすることがあるかもしれません。
そんなときはレイアウトファイル上でリフレッシュボタンをクリックして更新しましょう。
さて、如何だったでしょうか?
今回の記事で紹介したProjectのソースはGitHub grandbig/TableLayoutSampleに載せてあります。
ご自由にご利用ください。
因みに、今回はレイアウトの作成に注目して記事を書きました。
そのため、ボタンアクションなど必要な場合はMainActivity.javaに処理を追加してください。
と言ったところで本日はここまで。