始めに
たまには本格的にAndroid開発についてブログを書こうと思います。
最近は特に期待のAndroid Studio2.0の本リリースが近づいていると思いますし、筆者的にもiOS開発が集中してしまっていたのでモチベーションがAndroidによっています。
何はともあれシリーズ化を目指して、一先ず TabHost から扱ってみたいと思います。
TabHostを使ってみよう
さて、早速、TabHostを実装してみたいと思います。
1. Android StudioでBlank Activityを選択して、プロジェクトを新規作成
下記のようなプロジェクト構成ができあがります。
1
2
3
4
5
6
7
8
9
10
11
12
13
14
15
16
17
18
| app
┣━━ manifests
┃ ┗━━ AndroidManifest.xml
┣━━ java
┃ ┣━━ com.example.takahiro.tabhostapplication
┃ ┃ ┗━━ MainActivity
┃ ┣━━ com.example.takahiro.tabhostapplication(androidTest)
┃ ┃ ┗━━ ApplicationTest
┃ ┗━━ com.example.takahiro.tabhostapplication(test)
┃ ┗━━ ExampleUnitTest
┗━━ res
┣━━ drawable
┣━━ layout
┃ ┣━━ activity_main.xml
┃ ┗━━ content_main.xml
┣━━ menu
┣━━ mipmap
┗━━ values
|
2. content_main.xmlにTabHostを追加
下記のようなxmlが作成されます。
1
2
3
4
5
6
7
8
9
10
11
12
13
14
15
16
17
18
19
20
21
22
23
24
25
26
27
28
29
30
31
32
33
34
35
36
37
38
39
40
41
42
43
44
45
46
47
48
| <?xml version="1.0" encoding="utf-8"?>
<RelativeLayout xmlns:android="http://schemas.android.com/apk/res/android"
.....
tools:showIn="@layout/activity_main">
<TabHost
android:layout_width="match_parent"
android:layout_height="wrap_content"
android:id="@+id/tabHost"
android:layout_alignParentTop="true"
android:layout_alignParentStart="true">
<LinearLayout
android:layout_width="match_parent"
android:layout_height="wrap_content"
android:orientation="vertical">
<TabWidget
android:id="@android:id/tabs"
android:layout_width="match_parent"
android:layout_height="wrap_content"></TabWidget>
<FrameLayout
android:id="@android:id/tabcontent"
android:layout_width="match_parent"
android:layout_height="wrap_content">
<LinearLayout
android:id="@+id/linearLayout"
android:layout_width="match_parent"
android:layout_height="wrap_content"
android:orientation="vertical"></LinearLayout>
<LinearLayout
android:id="@+id/linearLayout2"
android:layout_width="match_parent"
android:layout_height="wrap_content"
android:orientation="vertical"></LinearLayout>
<LinearLayout
android:id="@+id/linearLayout3"
android:layout_width="match_parent"
android:layout_height="wrap_content"
android:orientation="vertical"></LinearLayout>
</FrameLayout>
</LinearLayout>
</TabHost>
</RelativeLayout>
|
3.各Tabで表示するためのActivityを作成
右クリックして、NEW > Activity > Empty Activityを追加したいタブ数分 追加する。
各Tabのレイアウトやデザインは各xmlファイルに書きたいので、
先ほどのcontent_main.xmlを修正します。
1
2
3
4
5
6
7
8
9
10
11
12
13
14
15
16
17
18
19
20
21
22
23
| <LinearLayout
android:id="@+id/linearLayout"
android:layout_width="match_parent"
android:layout_height="wrap_content"
android:orientation="vertical">
<include layout="@layout/activity_tab1" />
</LinearLayout>
<LinearLayout
android:id="@+id/linearLayout2"
android:layout_width="match_parent"
android:layout_height="wrap_content"
android:orientation="vertical">
<include layout="@layout/activity_tab2" />
</LinearLayout>
<LinearLayout
android:id="@+id/linearLayout3"
android:layout_width="match_parent"
android:layout_height="wrap_content"
android:orientation="vertical">
<include layout="@layout/activity_tab3" />
</LinearLayout>
|
<include layout="@layout/activity_tab1">のようにファイルのインクルードを指定します。
4.MainActivity.javaにTabHostの初期化および設定をする
1
2
3
4
5
6
7
8
9
10
11
12
13
14
15
16
17
18
19
20
21
22
23
24
25
26
27
28
29
30
31
32
33
34
35
36
37
38
39
40
41
42
43
44
45
46
47
| public class MainActivity extends AppCompatActivity {
@Override
protected void onCreate(Bundle savedInstanceState) {
super.onCreate(savedInstanceState);
setContentView(R.layout.activity_main);
// TabHostの初期化および設定処理
initTabs();
.....
}
....
protected void initTabs() {
try {
TabHost tabHost = (TabHost) findViewById(R.id.tabHost);
tabHost.setup();
TabHost.TabSpec spec;
// Tab1
spec = tabHost.newTabSpec("Tab1")
.setIndicator("Home", ContextCompat.getDrawable(this, R.drawable.ic_home_white_36dp))
.setContent(R.id.linearLayout);
tabHost.addTab(spec);
// Tab2
spec = tabHost.newTabSpec("Tab2")
.setIndicator("Event", ContextCompat.getDrawable(this, R.drawable.ic_event_white_36dp))
.setContent(R.id.linearLayout2);
tabHost.addTab(spec);
// Tab3
spec = tabHost.newTabSpec("Tab3")
.setIndicator("Event", ContextCompat.getDrawable(this, R.drawable.ic_event_white_36dp))
.setContent(R.id.linearLayout3);
tabHost.addTab(spec);
tabHost.setCurrentTab(0);
} catch (IllegalArgumentException e) {
e.printStackTrace();
} catch (RuntimeException e) {
e.printStackTrace();
}
}
}
|
これでタブでの画面遷移完成です!
完成した画面がこちら(TabHostしか実装してないので、簡素ですが…)
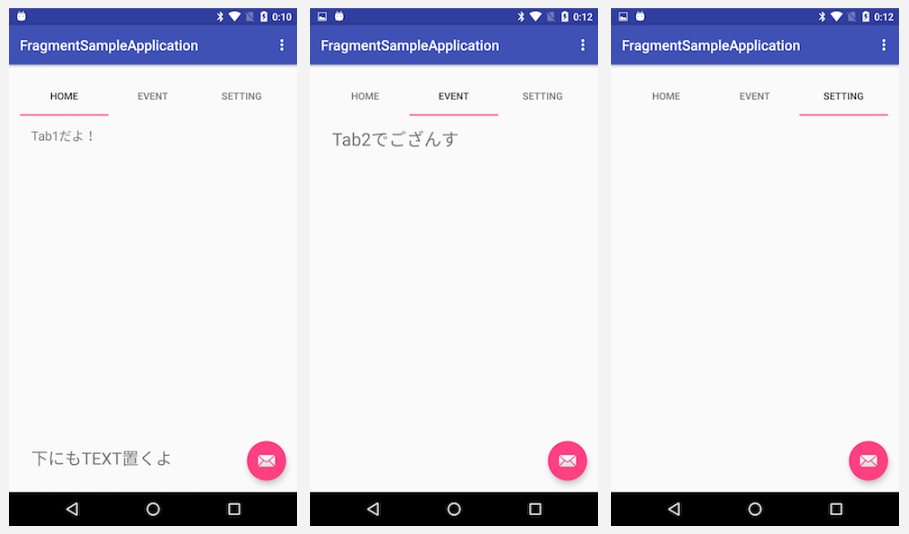
本日はここまで。